

Outdoor Beamshots
 Welcome to my backgrounder on the outdoor beamshots that you will see on all my reviews (over different time periods).
As I have observed over the years, outdoor beamshots are hard to do well. The shots will never match what you see by eye, due to the limitations of the camera (e.g. lower dynamic range, restrictive fixed settings, etc.). More importantly, there are innumerable compensations in your brain/visual system that invalidates any direct comparison (e.g. pupil responses, dynamic white balancing, etc.). When you throw in varying natural lighting conditions (e.g. moonshine, clouds reflecting ambient light, fog, etc.), plus all the 3D topographical landscape features that can confound a single light source, you get quite a lot to deal with!
So my approach to external beamshots has always been to simply pick a common exposure point to allow you to meaningfully compare a group of lights with similar characteristics, all taken at the same time under the best local conditions I could find (i.e. clear night, little wind, etc.).
I’m going to start by describing the current location that I am using (as of mid-2024), and then describe my previous beamshot site shown on older reviews.
But first, a word about how best to compare the images in your browser. All images are reduced to large thumbnails for the review pages – but each image is a link to a higher resolution shot. The best way to directly compare the lights is to open them in separate tabs. This should happen automatically when you click on each thumbnail. If it doesn’t, right-click on an image, and choose “Open Link in a New Tab”, or whatever term your browser uses. Then repeat this process for a second light, and so on. This way, you will then be able to switch between your browser’s tabs to see the matching higher resolution images taken at exactly the same position (i.e. the images should look stationary, with only the flashlight beam and my position changing).
Reviews from September 2024 onward
My old location is no longer easily accessible, so I have switched to a fairly secluded walking path through a wooded area. As before, I am taking pictures at one of two distances from the camera, 90 meters or 40 meters (shown in red and yellow on the google map below).

The soft gray path indicates the approximate walking path, which takes a sharp 90-degree turn at my focal point for the pictures. The lengths of the arrows indicates where the camera/tripod is positioned relative to that bend in the road, and the little figure indicates where I stand holding the lights.
Conveniently, there is a small copse of 3 dead trees right in the middle of the path just past where it makes its bend. This makes an excellent landmark for focusing the lights.
Here are two control shorts taken in early Fall 2024, at mid-day. My focus point for all the beamshots is the base of those 3 trees in the center of the frame
40 meters

90 meters

Unless otherwise indicated, all lights are run on Turbo, with freshly-charged rechargeable cells.
As before, all beamshot pictures are taken on my trusty old Canon Powershot S5 IS. The camera is set to a consistent f/2.7, 0.5 sec exposure, ISO 400, daylight white balance for all pictures now. These camera settings work well with this location to show off both the spill and throw of floodier lights, as well as the hotspots of dedicated throwers.
For all beamshots, I am standing ~4 meters in front of the camera/tripod, with the lights shinning at waist-level. This way, you can see the full spillbeam width, including any relevant edge effects, in the immediate distance, while still showing the ultimate throw.
Reviews before September 2024
From my very earliest reviews, I was able to keep a consistent location for all my outdoor long-distance (90 meters) beamshots. When I re-started reviewing in 2023, I made two key changes; I added a new location for floodier lights (40 meters), and I changed where I was standing relative to the camera/tripod. Specifically, beginning in 2023, I started standing ~4 meters in front of the camera holding the lights out in front of me at waist level (instead of at eye level over the camera previously).
Camera settings also changed a bit over time. In my old CPF reviews, my Canon PowerShot S5 IS was set to f/2.7, 5 secs exposure, ISO 80, with either automatic white balance for cool white lights (to minimize tint differences, which can be distracting), or daylight white balance for warm-tinted lights (to accurately reflect tint differences). Note that these settings led to the pics looking considerably under-exposed relative to what an observer would see – but again, the point was simply to pick a good comparison level to discriminate lights of that era.
With my return to reviewing, I wanted to capture a better feel for what the overall beams look like (for both spill and throw). I switched to f/2.7, 1 sec exposure, ISO 400, daylight white balance at the 90-meter location, and 0.5 sec exposure at the 40-meter location, for more consistency and better definition.
My initial location was an over-grown, closed and deserted service road. The 90-meter shots for throwy lights were taken at one part (shown in blue/red arrows below), and 40-meter shots for floodier lights in another section (shown in yellow below).

Throwy lights: 90 meters (100 yards)
As you can see on the left, there is a straight red line from the pictogram position along the road to a copse of trees located ~90 meters away. There is a dead birch tree right at the red arrow-head that is a convenient marker for the photos.
I’ve also highlighted a point a little under 30 meters from my position (blue arrow). The reason for this is shown on the side schematic for this area:
As this road goes along a ravine, and there is a significant elevation drop beginning about 30 meters in. The road makes a right turn as it winds down the ravine from this point. Here is my old 2010 daylight control shot in summer, to show you what I mean:

This shot was taken at eye level, and I have centered the camera on the copse of trees at 90 meters (specifically, right in the middle of the dead birch tree – red arrow). The blue arrow indicates the point at 30 meters beyond which the road “falls out of view” as it dips down. Note the trees and bushes have filled in since then, but you can still see some of the dead birch branches.
For all the old CPF outdoor beamshot pictures, I angled the light directly above the camera (roughly eye level), focused on the center of that dead birch tree. Because of the positioning, this meant that a good amount of the hotspot’s corona lit up the road up to that ~30 meter mark. You could thus see not only the centre beam throw and corona at 90 meters, but the corona and some of the wider spillbeam in the foreground just in front of the camera. Note however that this location never provided you a good view of the longer-distance spill (i.e., between ~30-90 meters).
As an aside, although you can’t see them in the daylight shot, there are a series of communication towers located in a clearing ~600 meters away. Although I didn’t realize it when first scouting this location, the red aerial warning lights on these towers will show up as distant red dots in the background of the night time shots. There’s also a photo-reflective sign along the bottom portion of the road that you will notice in the shots (left-over from when the road was in use, warning of the steep curve).
Floody Lights: 40 meters (45 yards)
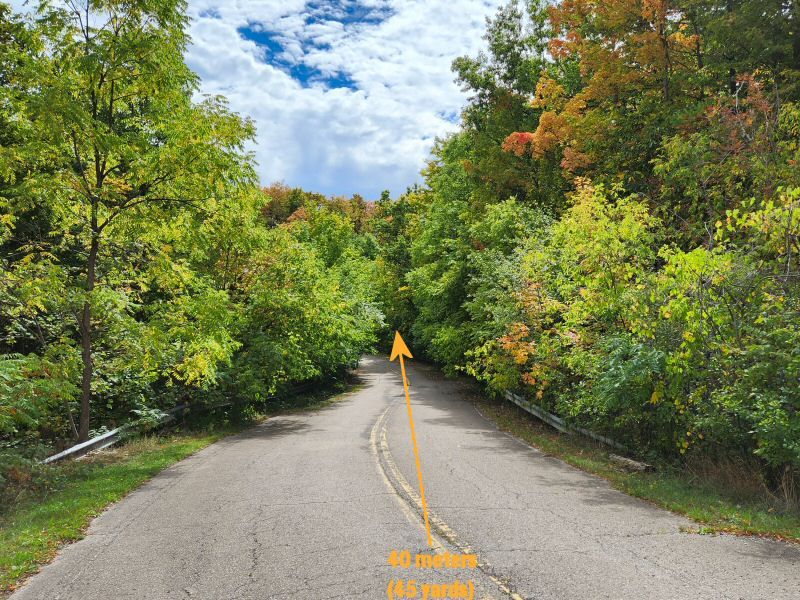
Starting in 2023, I used this particular stretch of the road for my floodier lights, which had just a mild incline. The control shot above was taken in early fall of 2022.
Although it is hard to see the bend in the road at 40 meters, this location was ideal for showing off the spill of floodier lights.