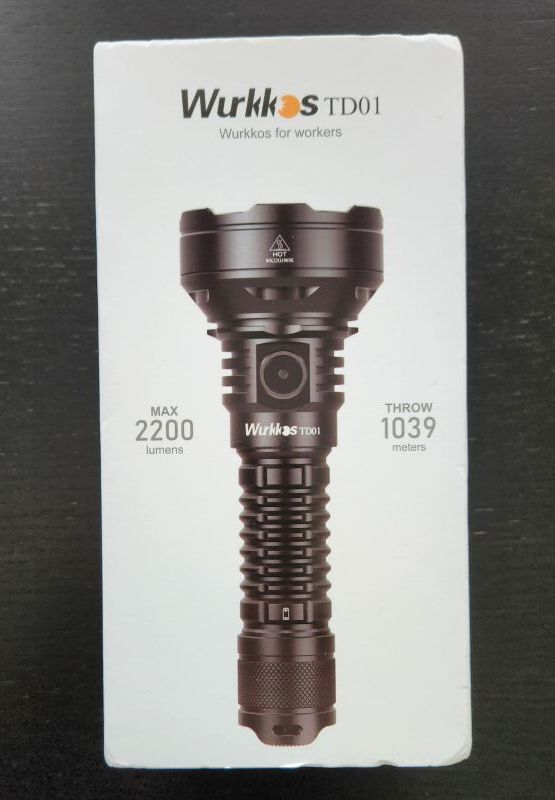
Wurkkos TD01

The TD01 is a budget tactical flashlight featuring a TIR lens for maximum throw with minimal spill. Powered by a single included 21700 battery, with both tactical and general user interface options.
- Introduction
- Manufacturer Specifications
- Package Details
- Build
- User Interface
- Circuit Measures
- Emitter Measures
- Beamshots
- Testing Results
- Runtimes
- Pros and Cons
- Overall Rating
- Preliminary Conclusions
- Acknowledgement
Introduction
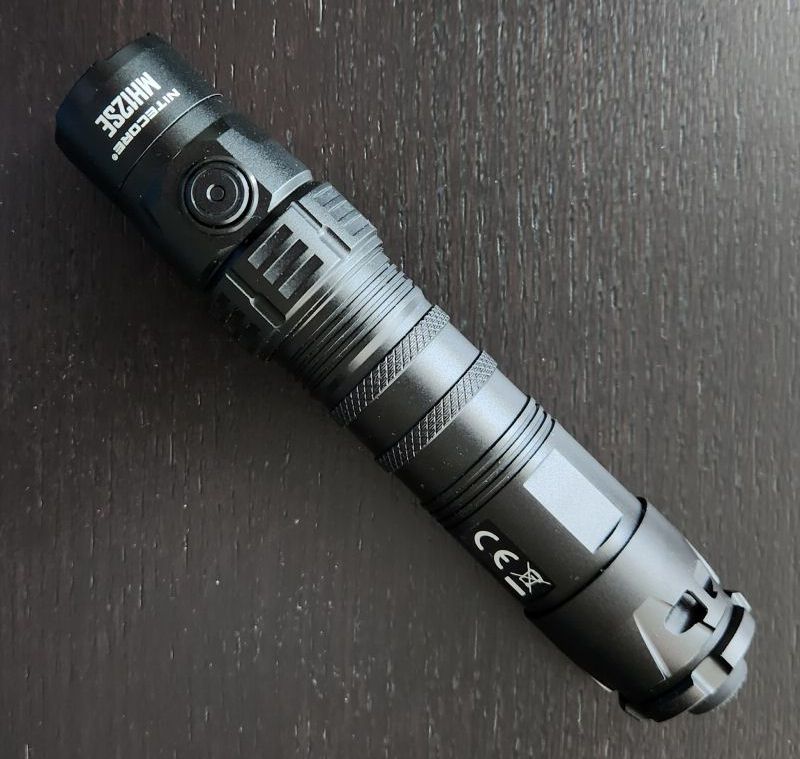
The TD01 is a new tactical/hunting-style flashlight from Wurrkos. Featuring the low-profile Luminus SFT40 coupled with a large focused TIR, this 1×21700 flashlight is clearly designed to be a dedicated thrower. I was certainly impressed with the compact TS22 from Wurkkos, so am happy review this larger thower model.
Physically, the light is still fairly compact for having such a large head. There is also a tailcap forward clicky switch, coupled with an electronic side switch in the head. This design is very reminiscent of the reflectored Sofirn C8L – a comparison which, as we will see, runs more than skin deep.
Let’s see how it compares in my testing.
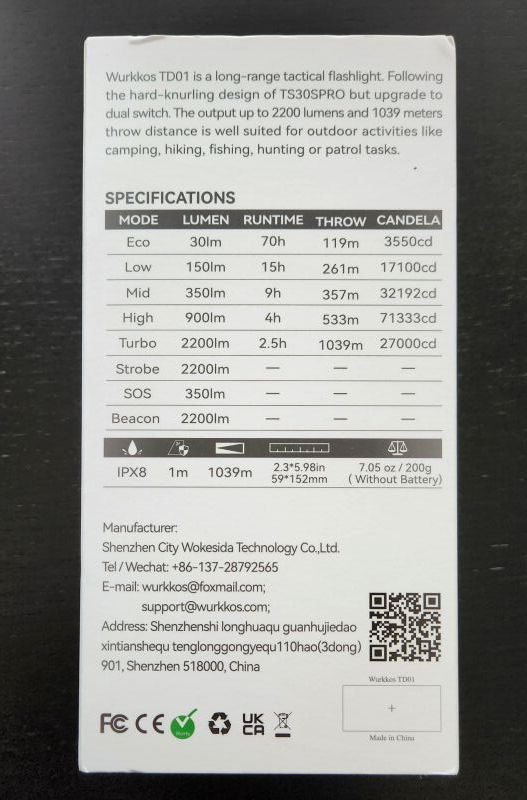
Manufacturer Specifications
Note: as always, these are simply what the manufacturer provides – scroll down to see my actual runtimes.
| Feature | Specs |
|---|---|
| Maker | Wurkkos |
| Model | TD01 |
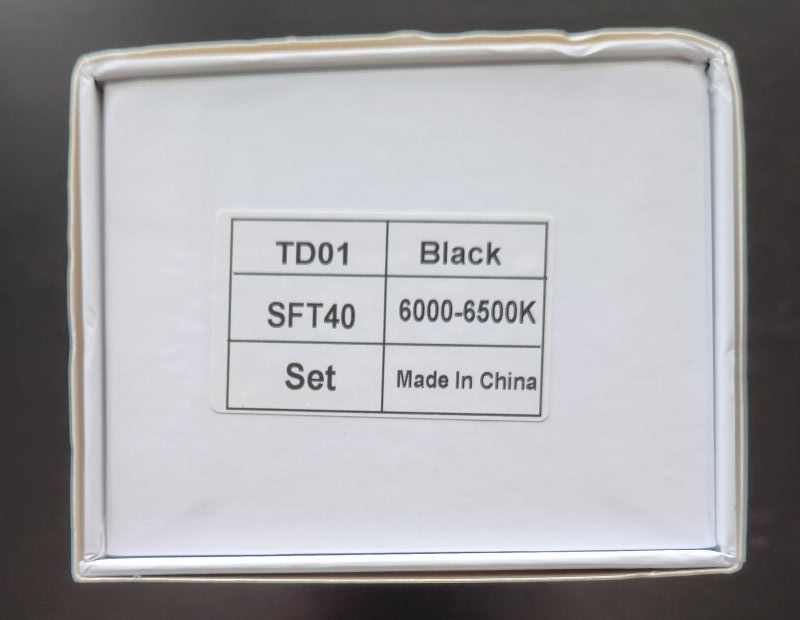
| Emitter | SFT40 |
| Tint | 6000 - 6500 K |
| Max Output (Lumens) | 2,200 |
| Min Output (Lumens) | 30 |
| Max Runtime | 70 hours |
| Max Beam Intensity (cd) | 270,000 cd |
| Max Beam Distance (m) | 1039 m |
| Constant Levels | 5 |
| Flashing | Strobe, SOS, Beacon |
| Battery | 1x21700 |
| Weight (w/o battery) | |
| Weight (with battery) | 200 g |
| Length | 152 mm |
| Head Diameter | 59 mm |
| Body Diameter | - |
| Waterproof | IPX-8 |
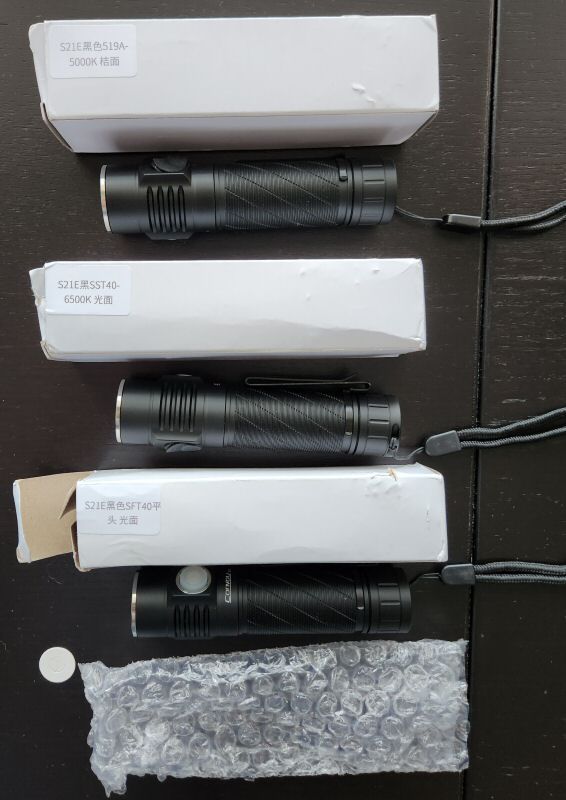
Package Details
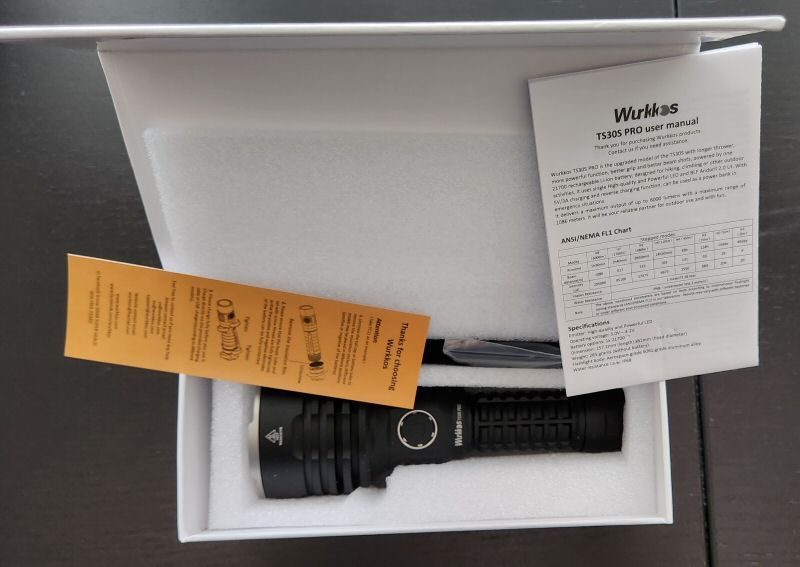
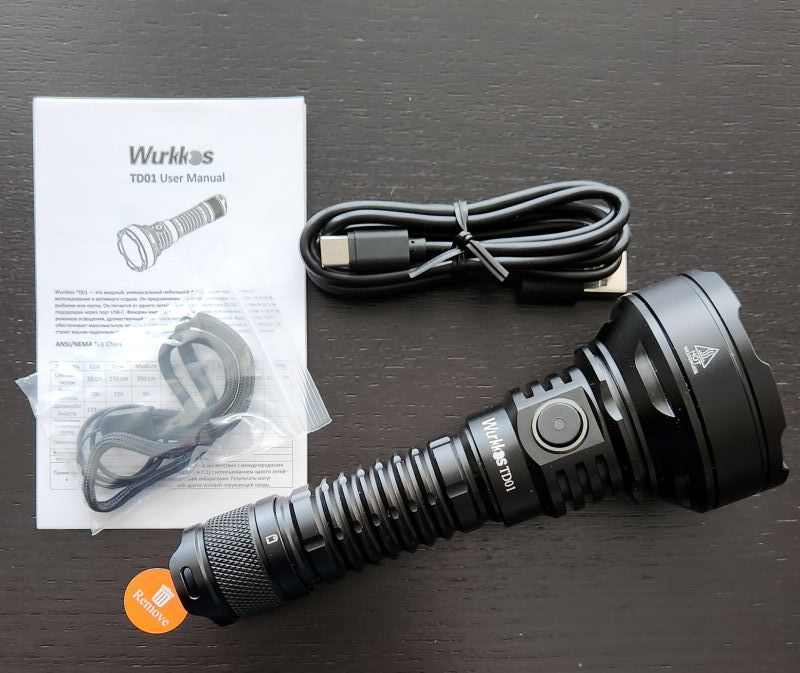
I really like the packaging of the higher-end lights from Wurkkos (and Sofirn, which share a common manufacturing plant). The hard-sided box comes with a lot of printed specs on the sleeve, and a clear separation of items and components inside thanks to the cut-out foam. Inside the box, I found:
- Wurkkos TD01 flashlight
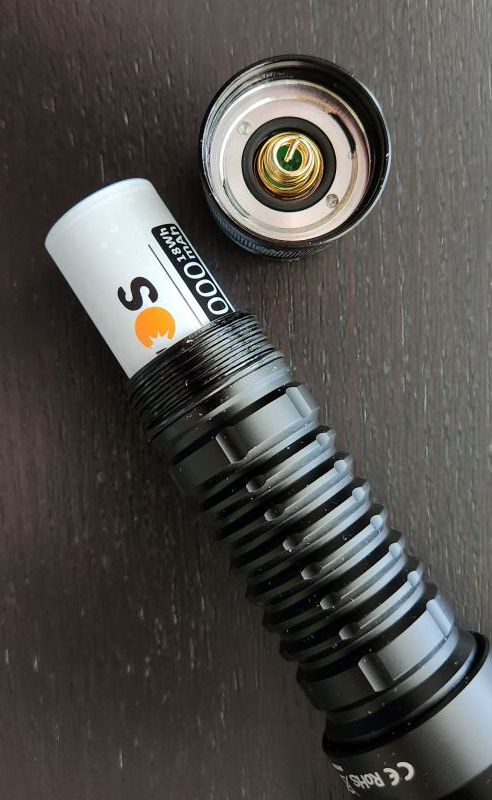
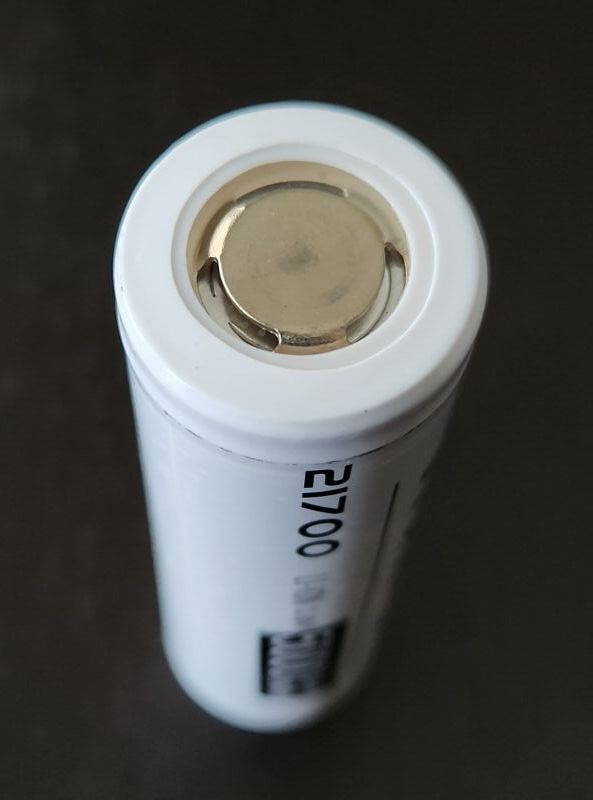
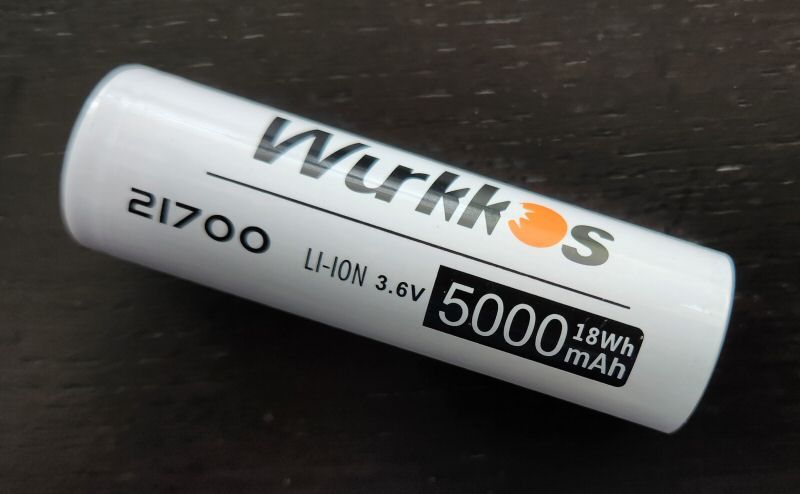
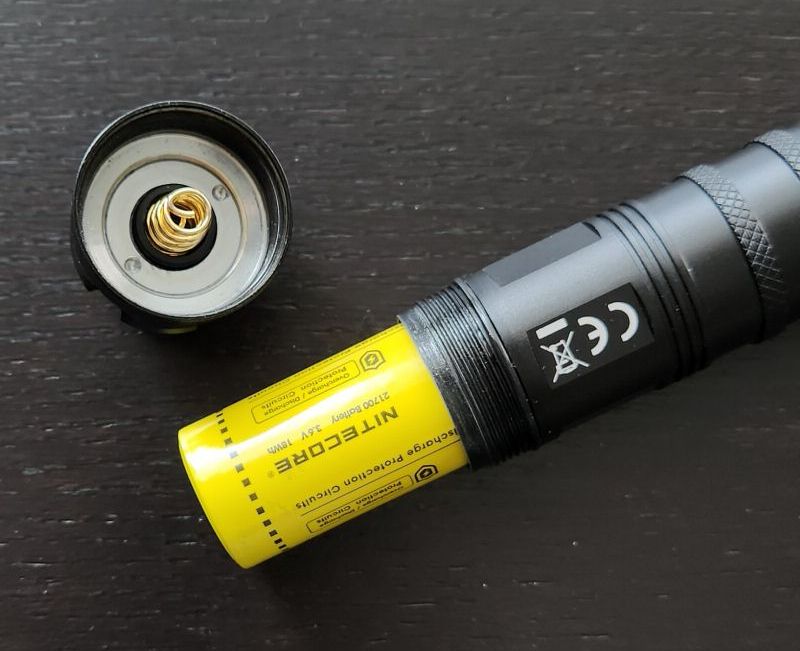
- Wurkkos-branded 5000mAh 21700 battery
- Wrist lanyard
- USB-C charging cable
- 2 Spare O-rings
- Manual
It’s a decent package for a “budget” build, but I would really like to see a holster included. These form factor lights tend not to fit well into after-market holsters.
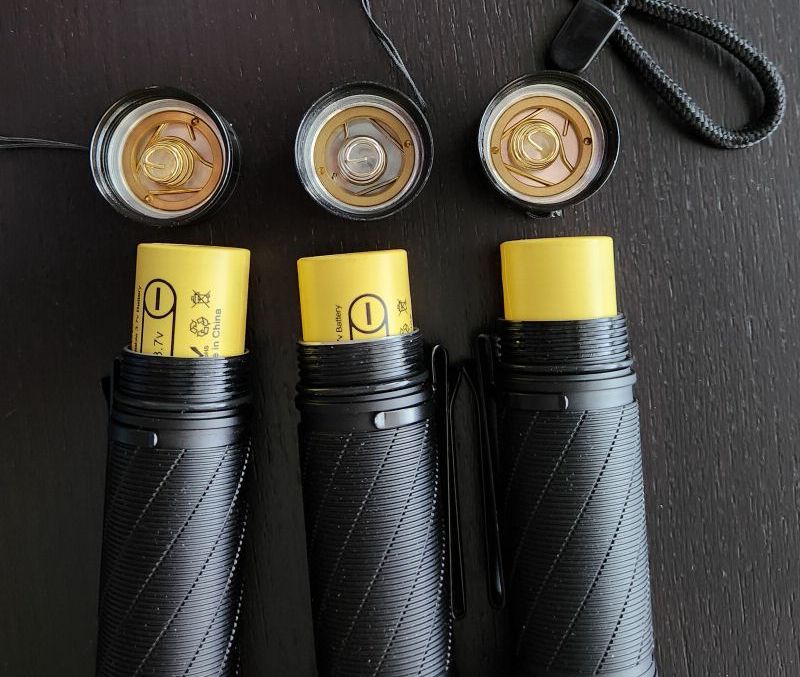
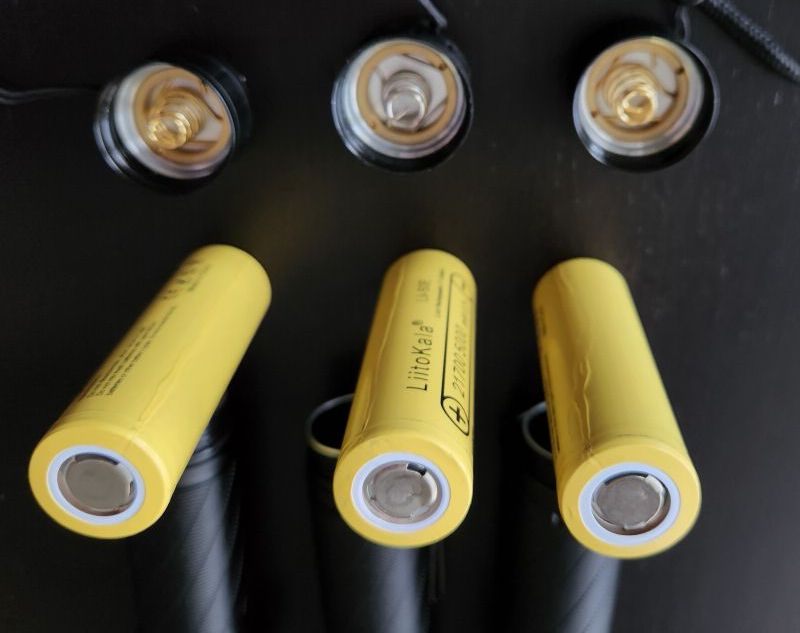
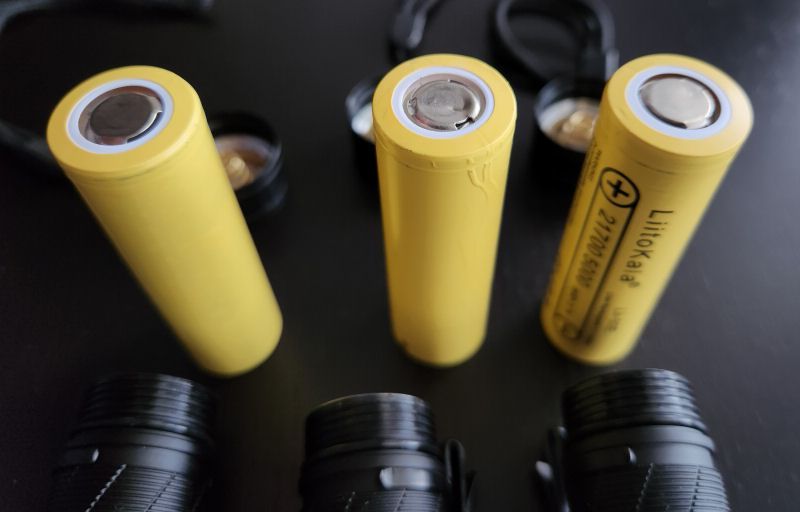
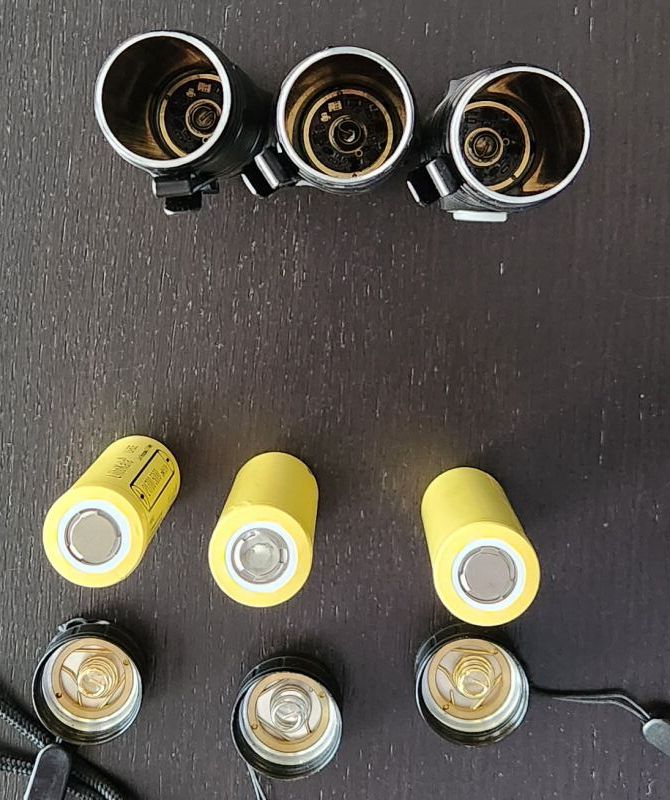
Build
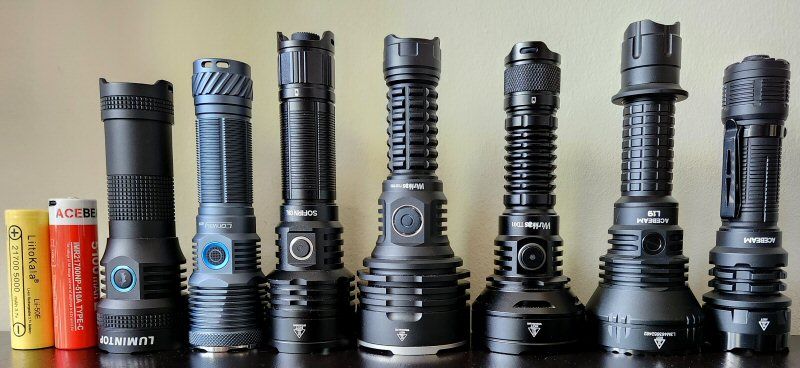
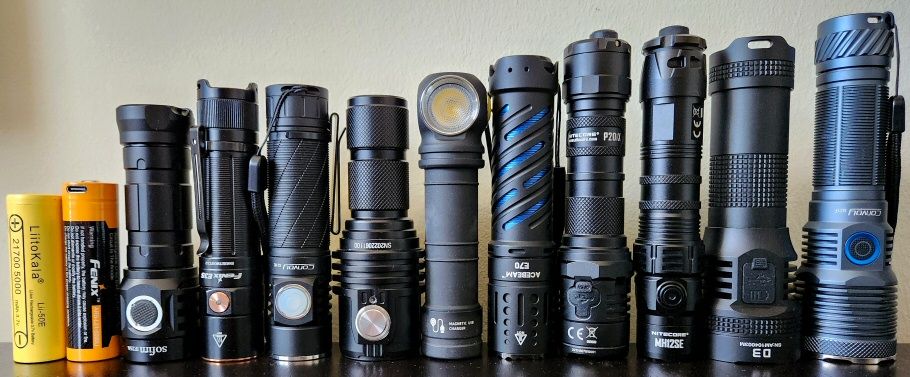
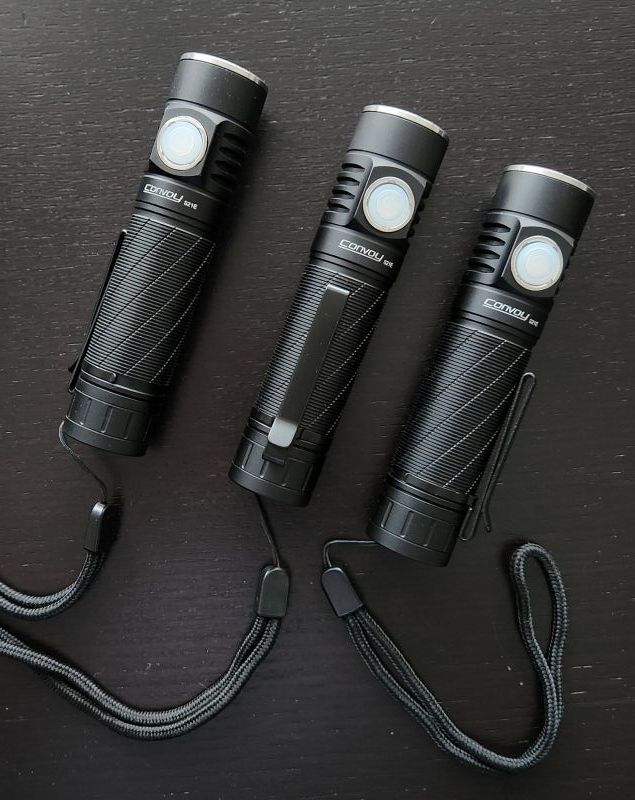
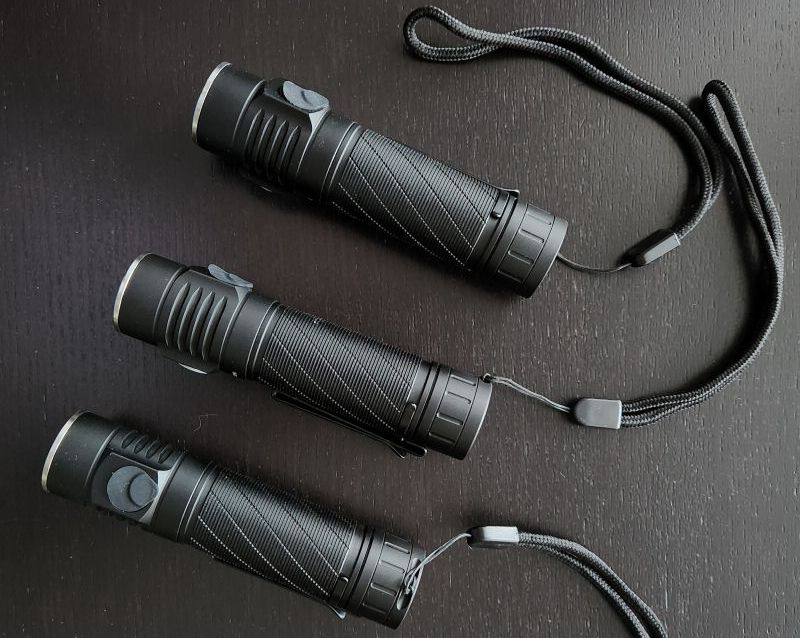
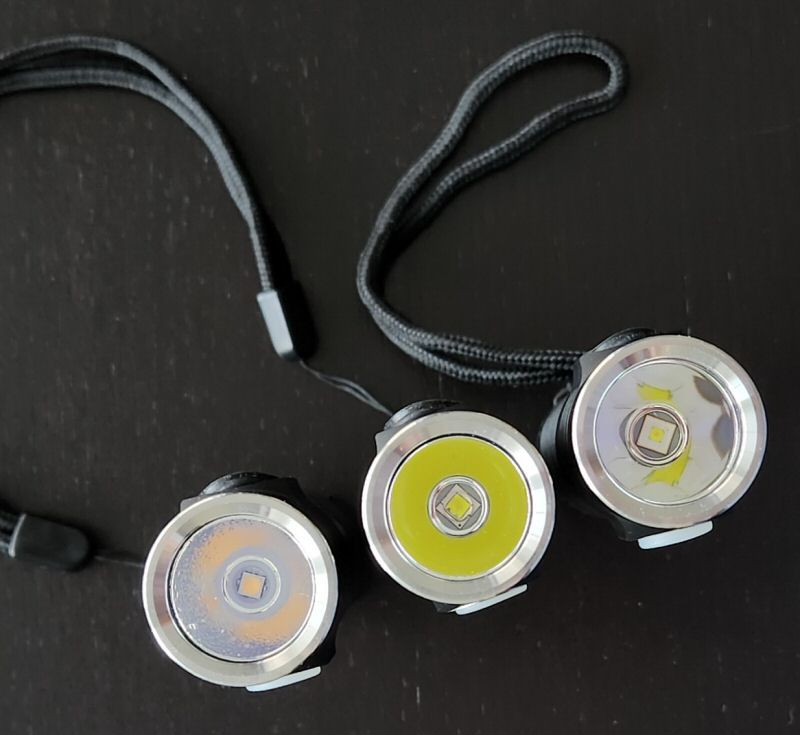
From left to right: LiitoKala 21700 (5000mAh), Acebeam 21700 USB-C (5100mAh), Lumintop D3, Convoy M21F, Sofirn C8L, Wurkkos TS30S Pro, Wurkkos TD01, Acebeam L19 V2.0, Acebeam P17.
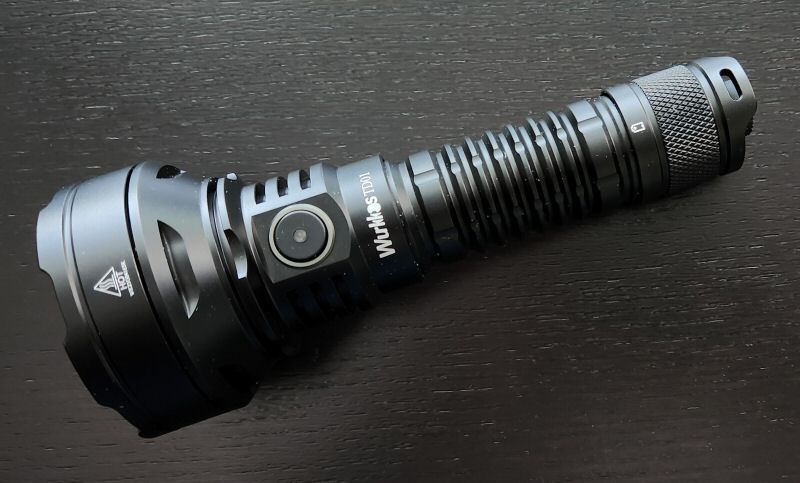
The Wurkkos TD01 immediately reminds me a lot of the Sofirn C8L in its overall build and feel. This is not surprising, since these lights come off the same manufacturing production line. I will get into the specifics below, but it is a solid build overall, with good handfeel. I would rate it as above average quality for a budget light, but lacking some of the nicer touches of a true top-of-the-line light. And while substantial in overall dimensions and weight, it is still pocket-able to some degree (i.e., with the head protruding out).
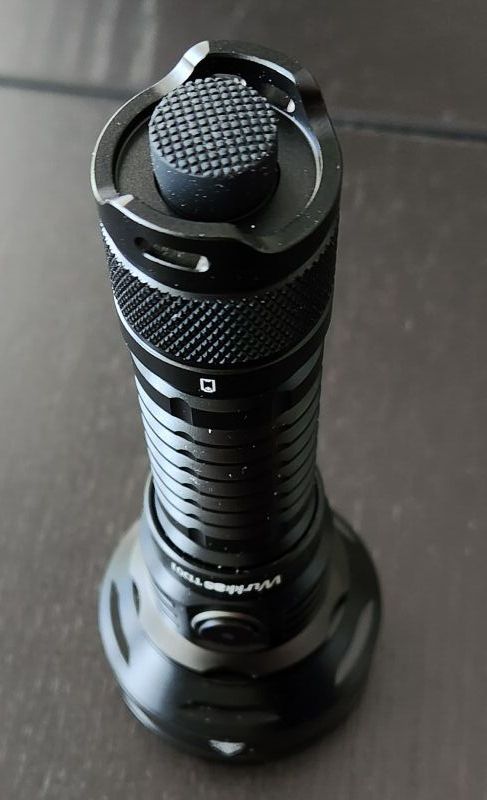
Like the C8L, there is a physical forward clicky switch in the tailcap, used for the turning the light on/off. However, switch feel is not as good on this particular sample – I find it too “soft and squishy” (i.e., you need to press more than expected to activate in momentary mode, and it’s too easy to then accidentally click). This makes momentary or a double-press (required to jump to Turbo from Off) tricky to do consistently. See the user interface section below for more information.
There are two raised tailcap guards that can serve as the lanyard attachment point. However, unlike the C8L (which had exact same arrangement), my TD01 is not able to tailstand at all – the tactical switch protrudes too far, beyond the switch guard rails. This is a missed opportunity on this model (or at least, this sample).
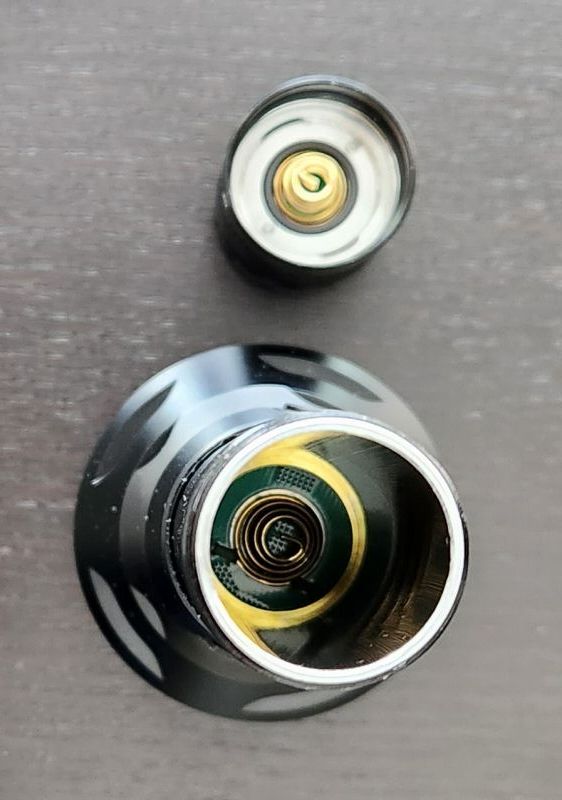
Tailcap threads are square-cut and anodized, with good feel. I always recommend you keep a light stored locked out when not in use. Thanks to the anodized tailcap threads, you can do this easily on the TD01 by a simple twist of the tailcap.
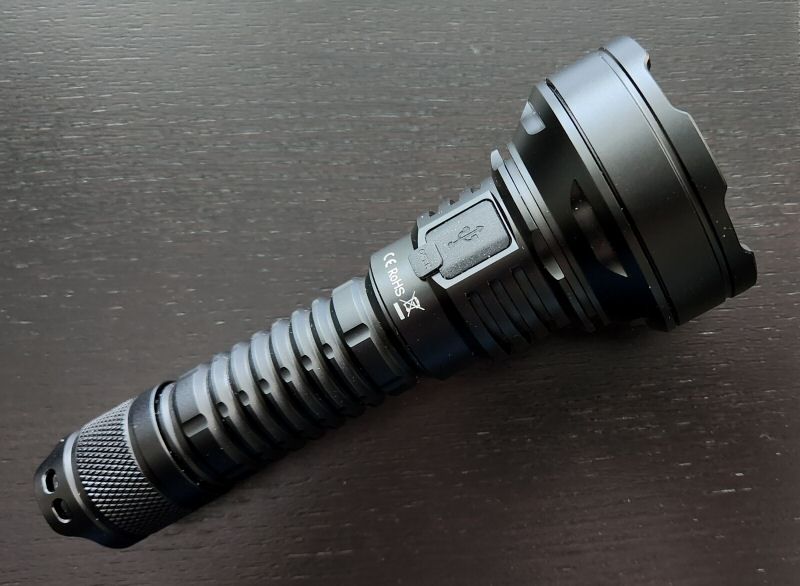
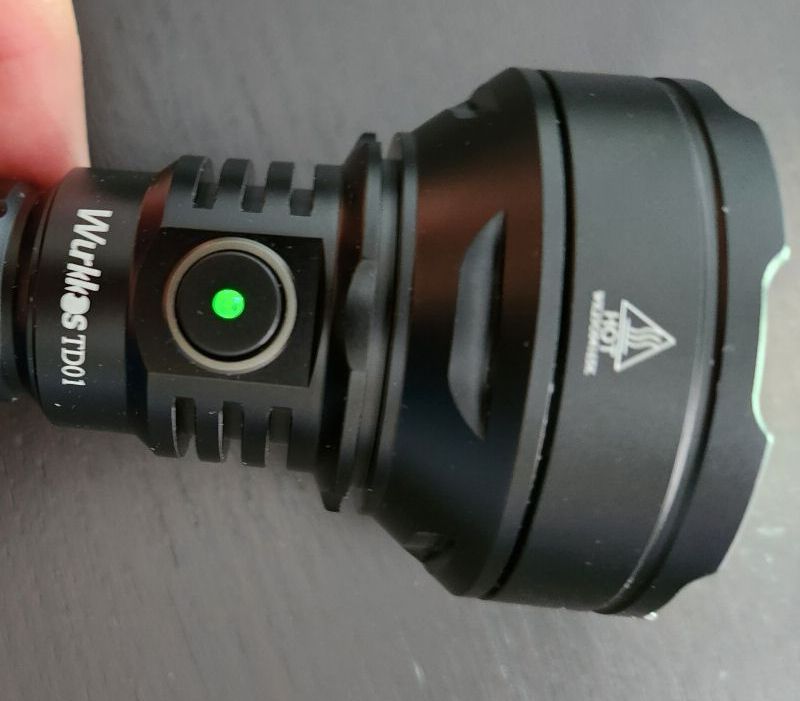
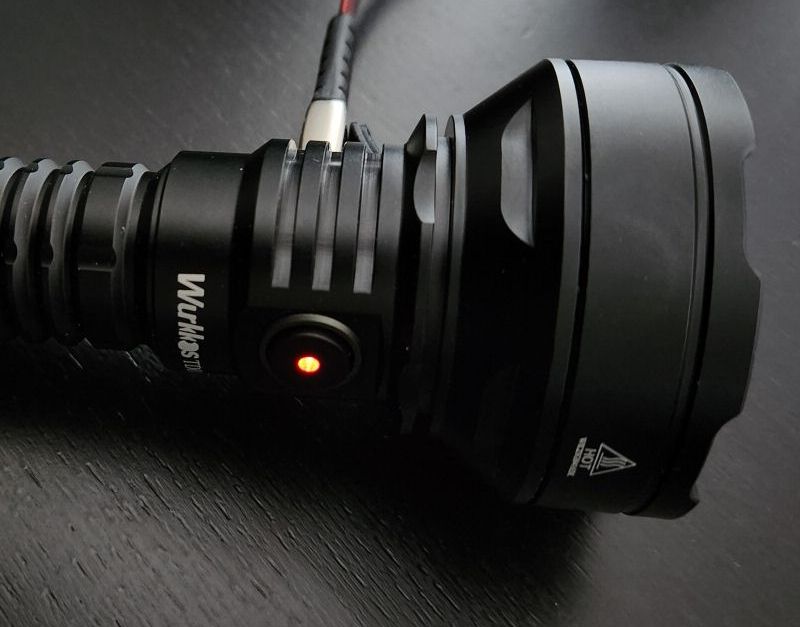
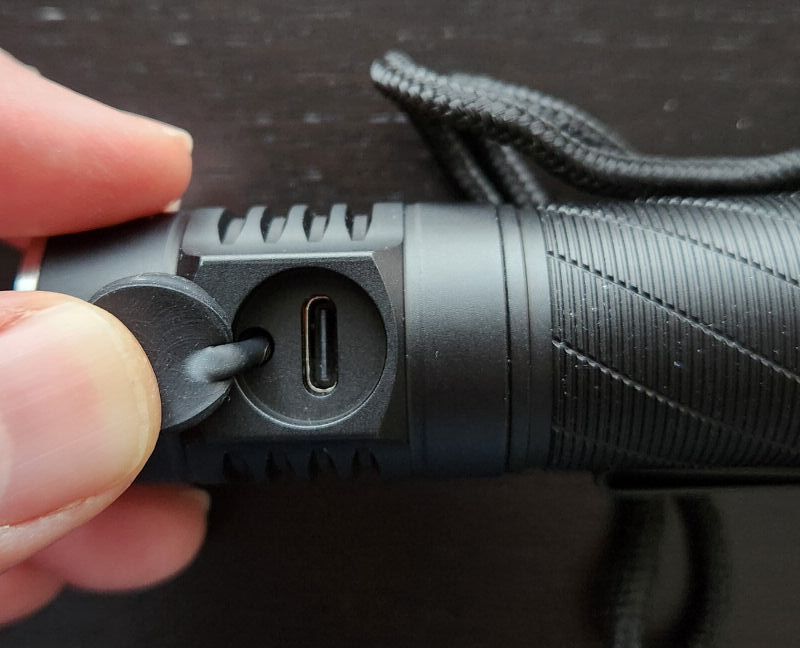
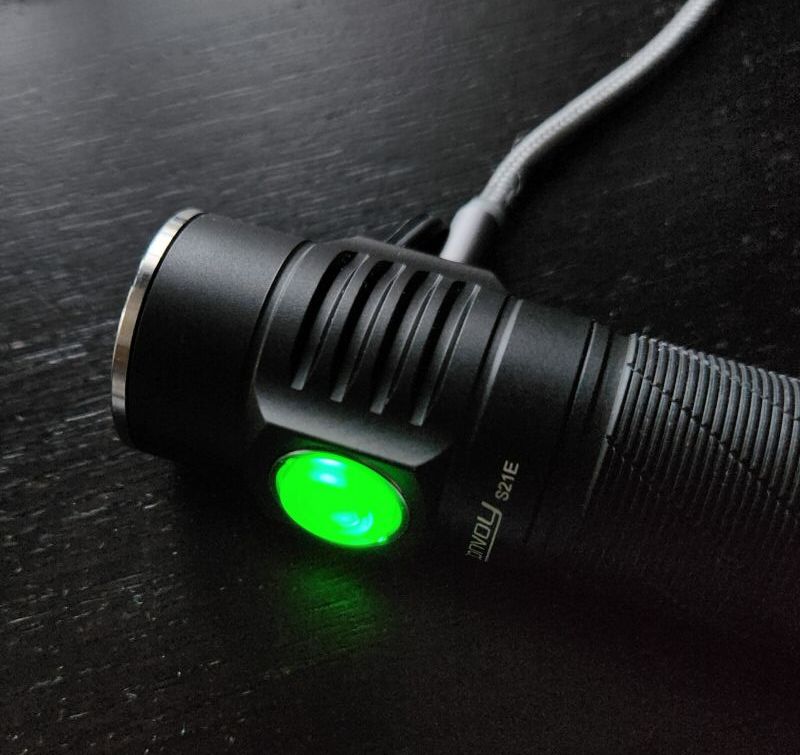
There is a raised side-mounted electronic switch on the side of the head, with red and green LEDs underneath to show charge status. Feel and traverse of the electronic switch is very similar to a lot of Wurkkos and Sofirn lights – it’s ok, but could be a bit tighter/firmer (i.e., hard switch covers always have some degree of play).
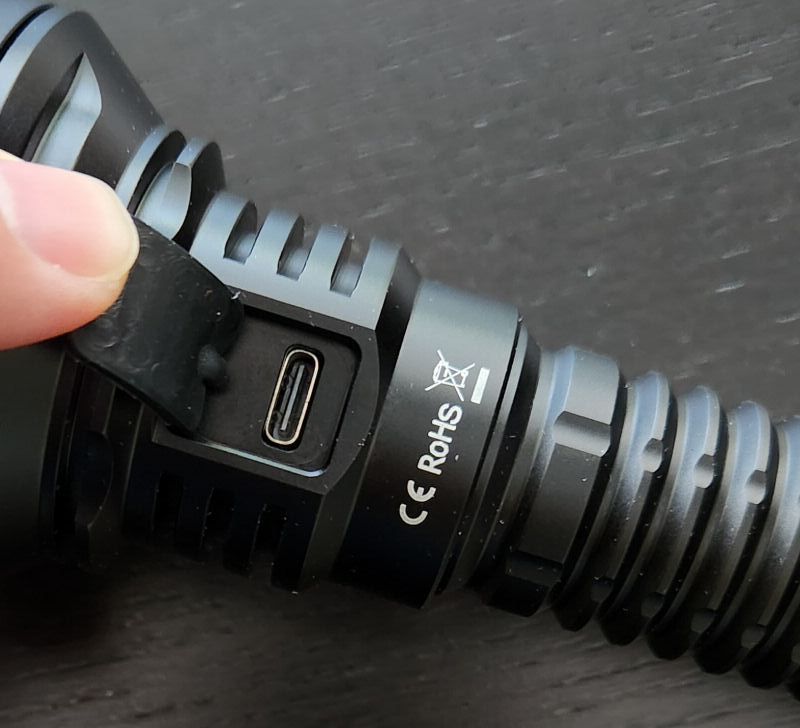
The side switch shines a bright red when charging the battery through the light’s USB-C charging port (green when fully charged). The port is located on the opposite side from the switch, under a rubber cover. The cover fits pretty well on the TD01 (just like the C8L) – not too too tight, not too loose. I expected waterproofness is reasonable.
There is no actual knurling on the light, but large raised concentric rings around the body tube help with grip (pattern is virtually identical to the Wurkkos TS22). When combined with the head and tailcap ridge detail, I would say overall grip is pretty good. Note that the light can roll away completely unfettered when on its side – the head has a completely smooth round edge, and lacks any cut-outs of any kind (even the C8L had some gentle ones, to help reduce roll a little). I recommend you stand it upright on its head when not in use. Anodizing looks to be good quality for type II, with no damage on my sample. I would describe the finish as satin.
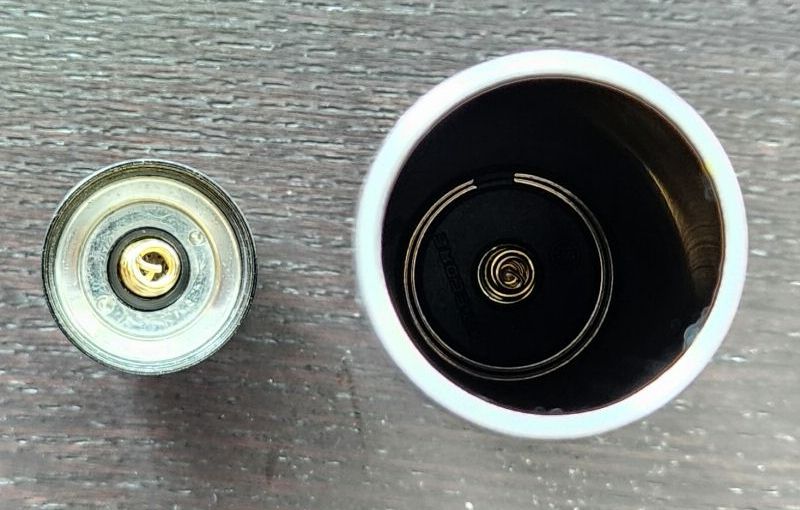
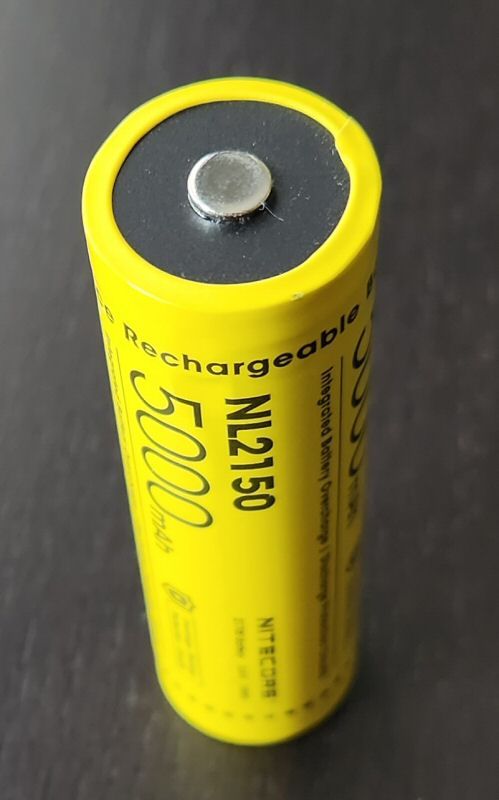
Inside, the light comes with a Wurkkos-branded standard-sized 5000mAh 21700 battery, with a slightly raised flat-top. There is a good size spring in the head, ensuring good contact (always a good idea for a “tactical” light).
As with all things, it comes down to your expectations. The TD01’s build is a very good approximation of a quality tactical light, but it does have a number of small issues and inconsistencies that add up (and reflect its budget status).
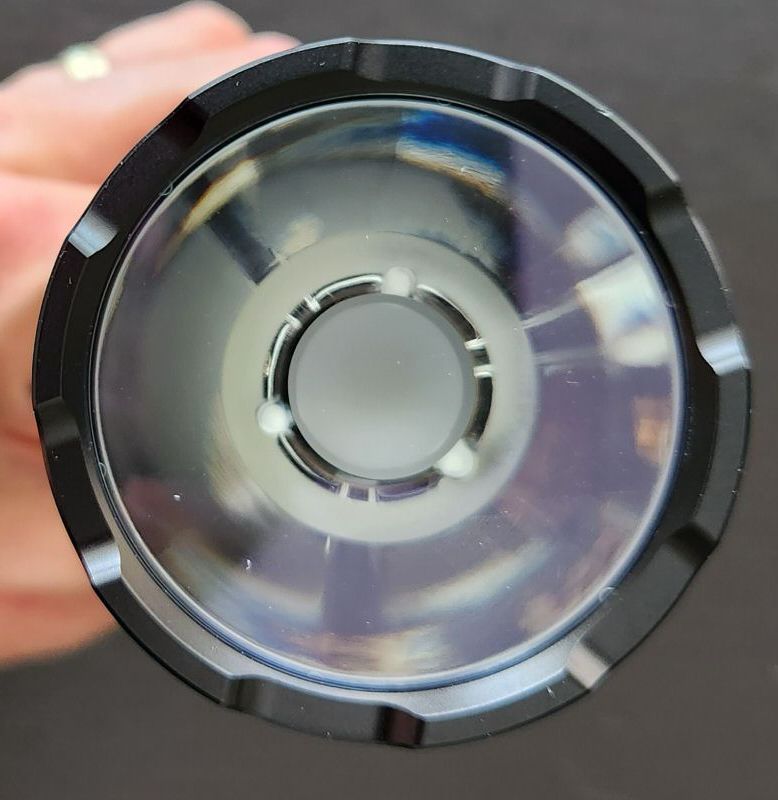
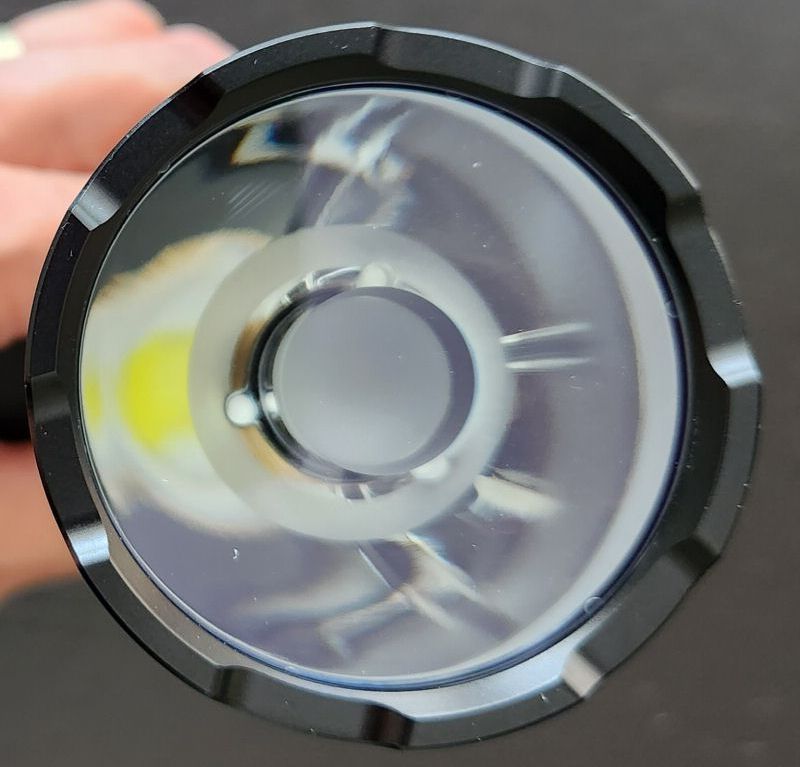
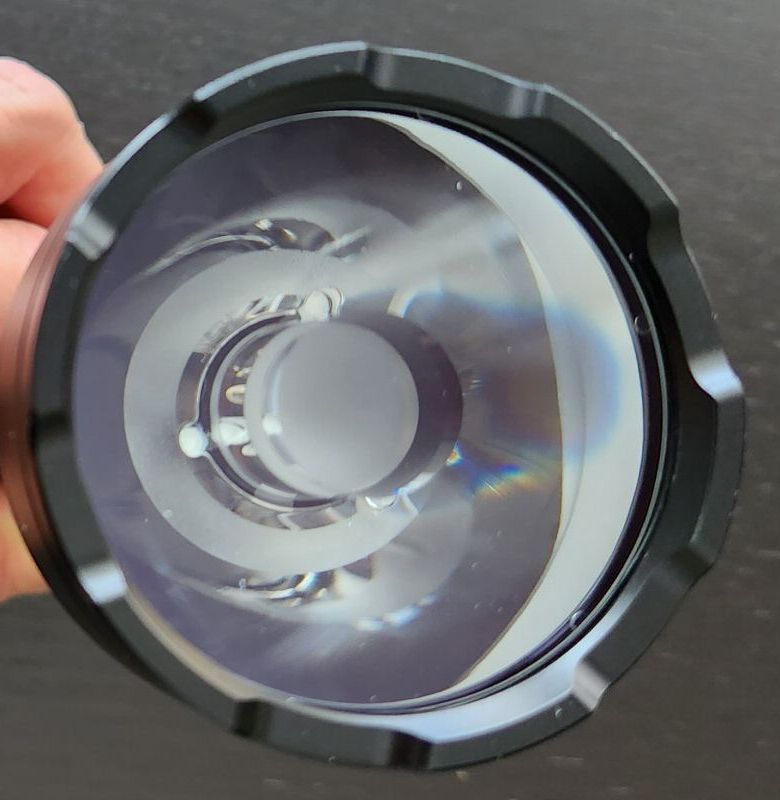
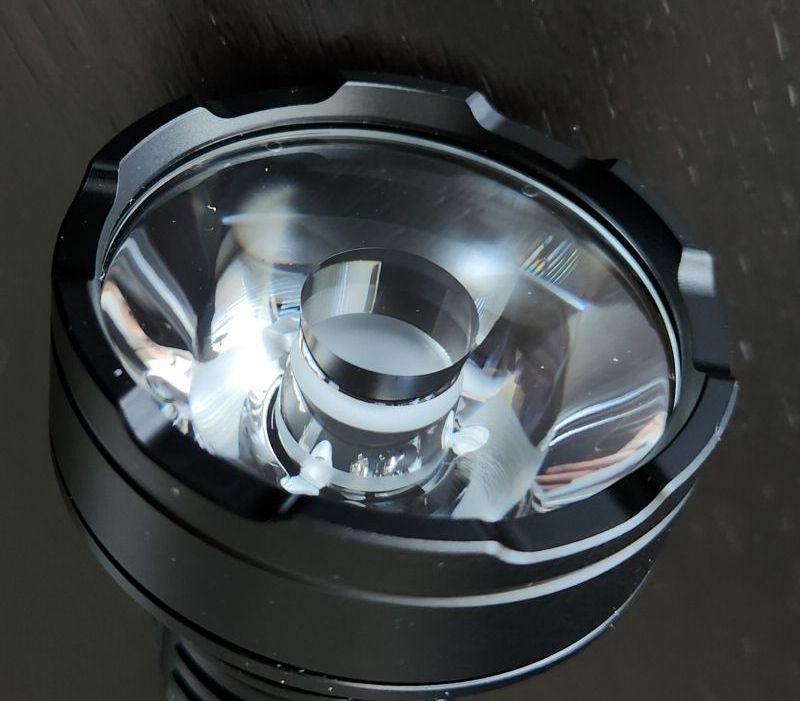
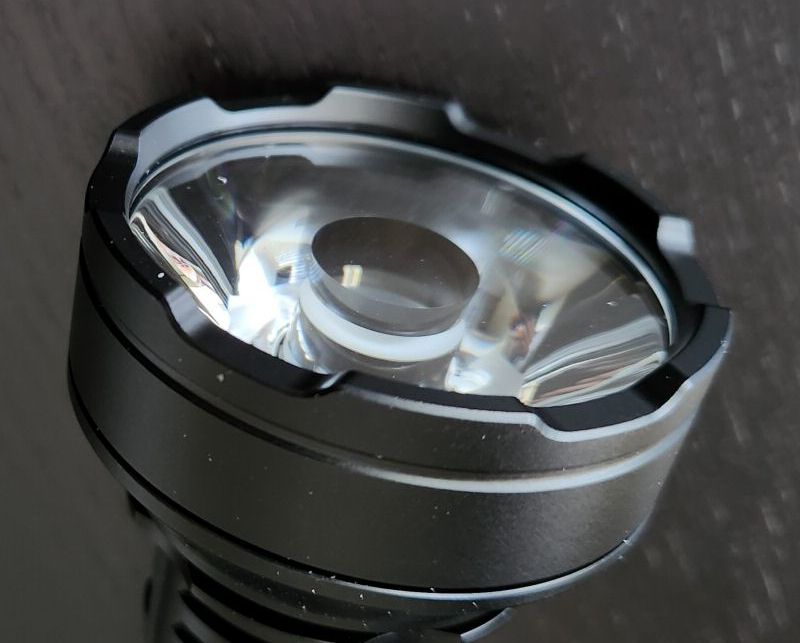
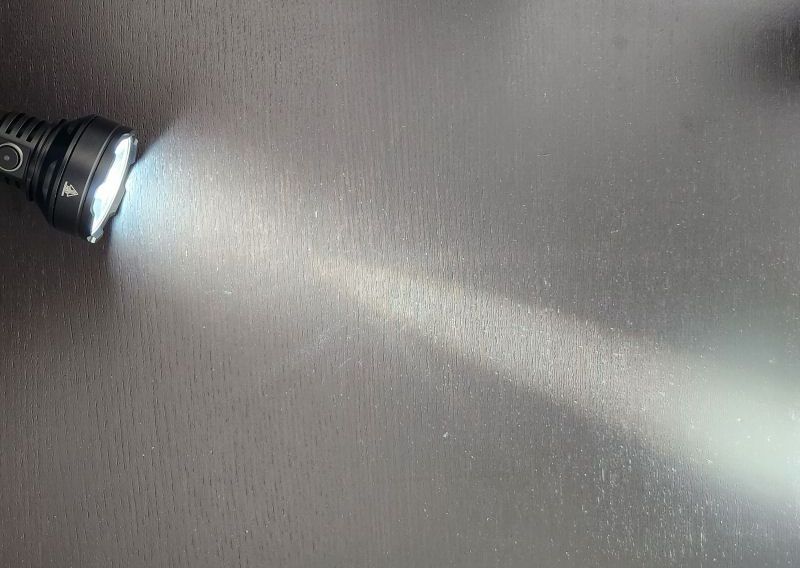
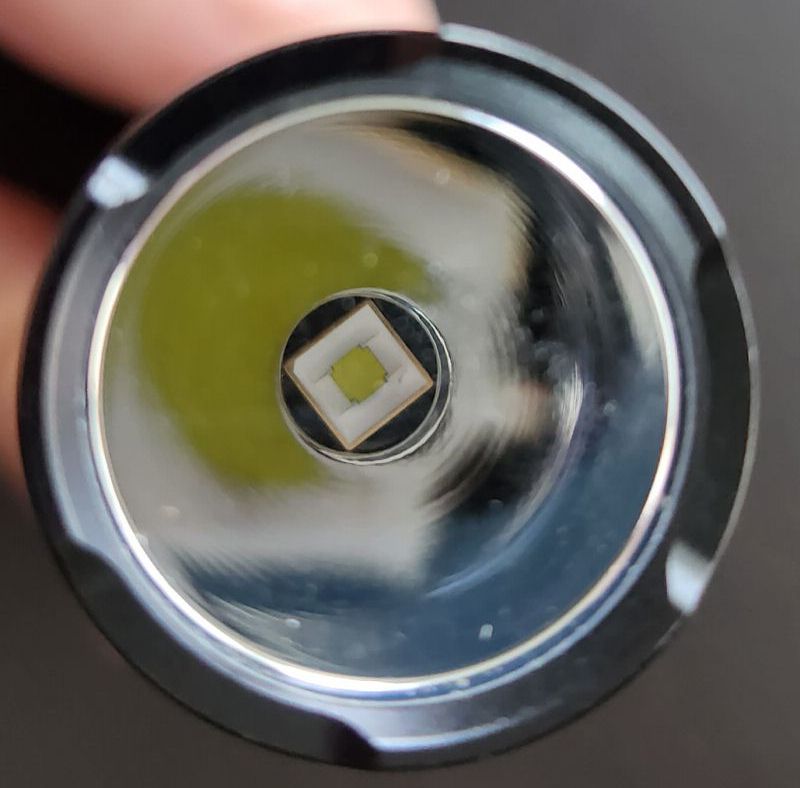
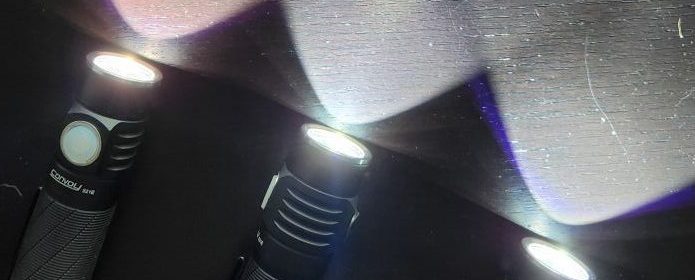
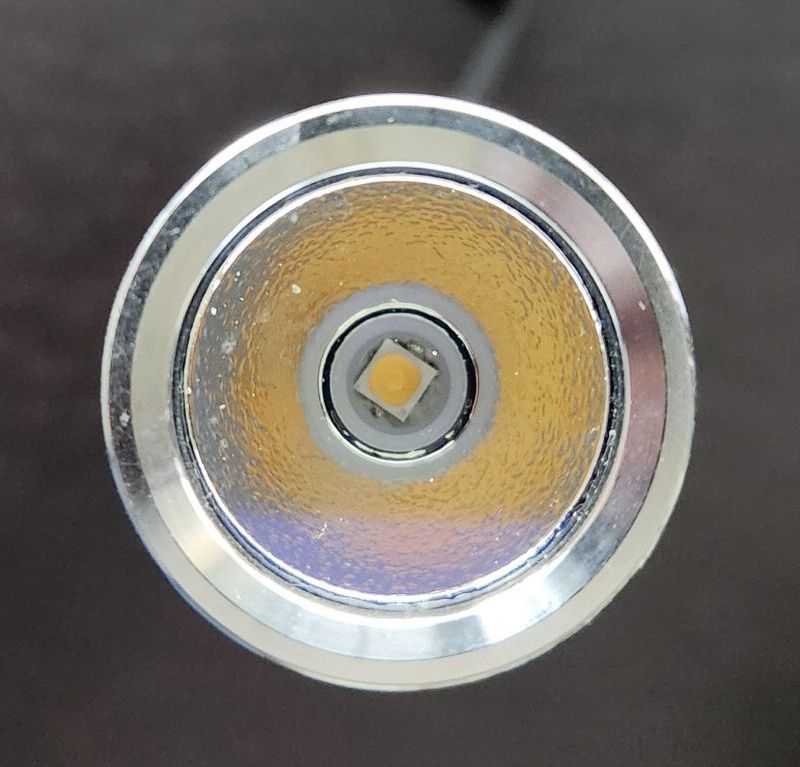
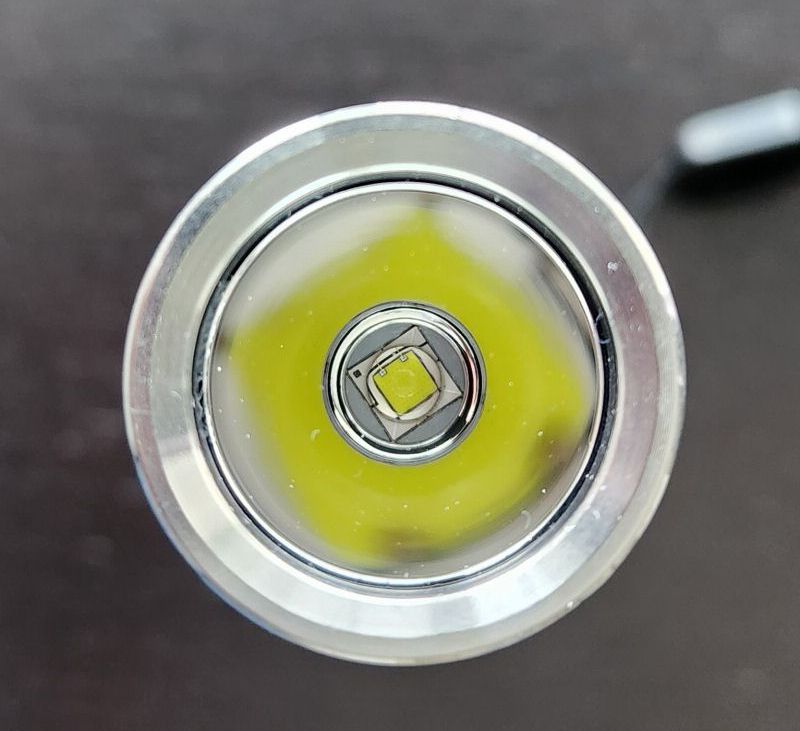
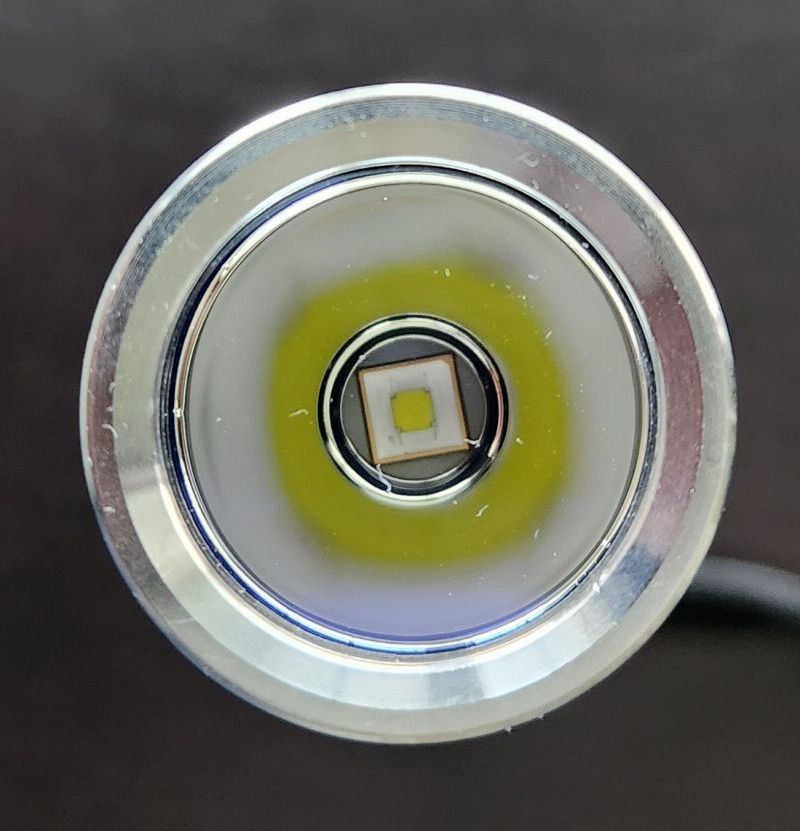
The TD01 uses a very distinctive large TIR optic looks a lot like the Acebeam L19, except with a thicker centre “column.” I’ve taken pics from a lot of angles above, so you can see how it generally obscures the emitter (except in the second shot above). The low-profile SFT40 is ideal for producing a very focused beam, which the TD01 does very well.
The bezel is crenelated black aluminum – not too aggressive, so you can headstand stably. Note that some of the promotional material seems to suggest the light has a stainless steel strike bezel – it doesn’t, just this low profile aluminum bezel (again, in keeping with its budget nature). There doesn’t seem to be any kind of anti-reflective coating on the lens.
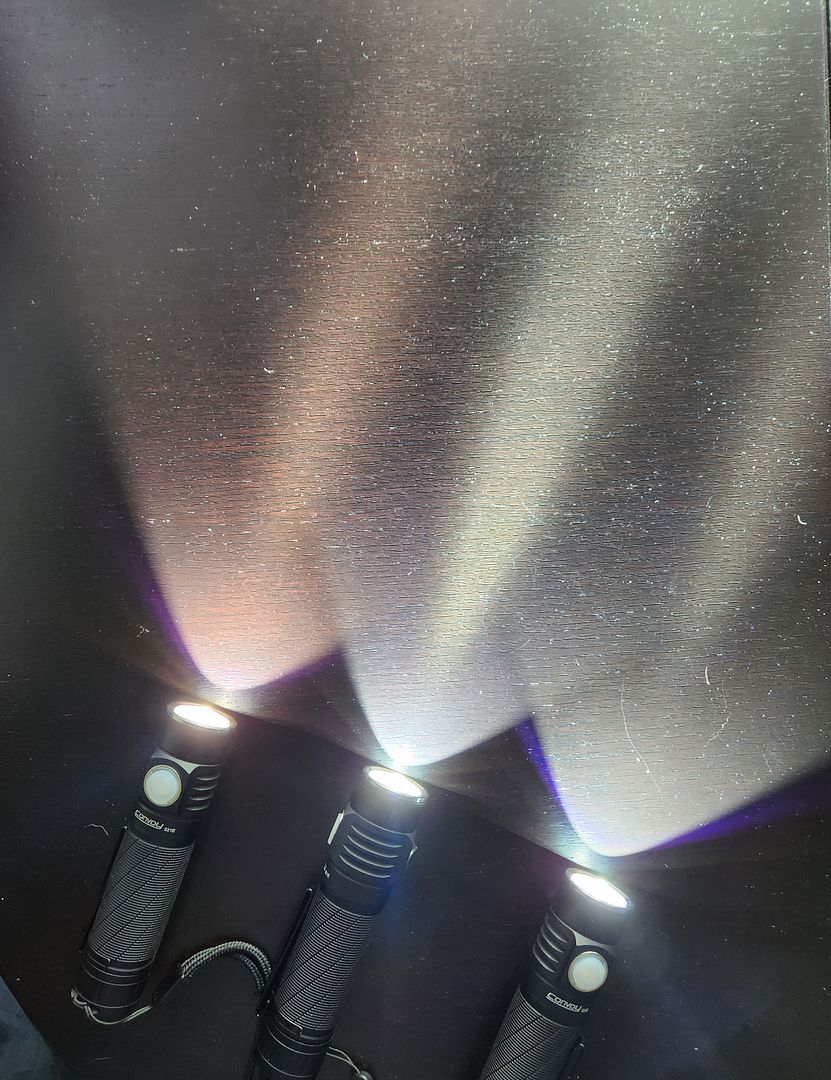
Here are a couple of white wall beamshots, to give you an idea of how focused it is:
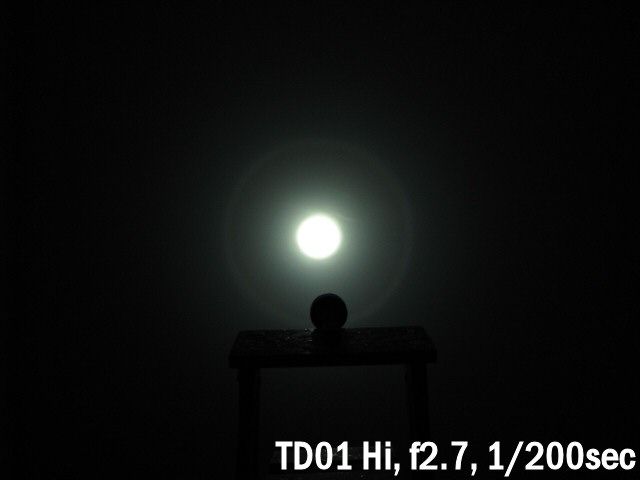
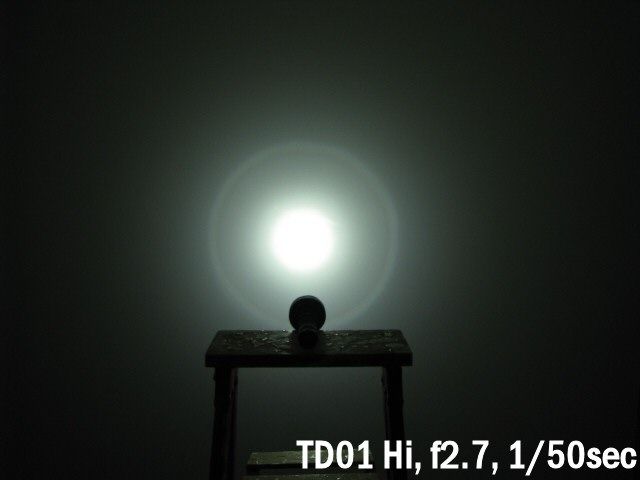
I’ve included the white wall beamshots above to highlight a single bright ring that is visible in the mid-distance around the hotspot. Note that in real life the hotpot is much smaller than it appears above (the camera settings are over-saturating the hotspot intensity). But I’ve chosen these settings to better show you the ring. Rest assured, the ring is not that distracting in real life, but it is present (scroll down for outdoor beamshots).
User Interface
The TD01 has a user interface that is identical to the Sofirn C8L, again reflecting their shared heritage. Like many “tactical” lights, you have two sets of possible modes; Mode Group 1 for General use, and Mode Group 2 for Tactical use.
To switch between groups, press-and-hold the side switch for >3 secs when On.
Mode Group 1 (default) available levels: Eco, Low, Medium, High, Turbo, Strobe, SOS, and Beacon.
Mode Group 1, from OFF:
- Tail switch, partial-press: Momentary On in last memorized mode.
- Tail switch, single-click: Turns On in last memorized mode.
- Tail switch, double-press: Turns On in last memorized mode and then jumps to Turbo (click to stay locked-on in Turbo). You have be very rapid on the double-press to jump to Turbo.
- Side switch, press-and-hold: Nothing – but if you click the tail switch while holding down the side switch, the light will activate in Eco mode.
- Side switch, single-click: Nothing.
Mode Group 1, from ON:
- Tail switch, partial-press: Nothing.
- Tail switch, single-click: Turns Off.
- Side switch, press-and-hold (3 secs): Switch to Mode Group 2 (see below)
- Side switch, single-click: Steps up to the next non-Turbo constant output mode (in sequence, Eco > Lo > Med > High).
- Side switch, double-click: Turbo.
- Side switch, triple-click: Strobe.
- Side switch, double-click when in Strobe: Cycle through in sequence Strobe > SOS > Beacon (with no mode memory).
Mode 1, Mode memory:
Yes, for non-Turbo constant output modes.
Mode 1 Shortcuts:
- Eco mode: Press and hold the side switch while turning on at the tail switch.
- Turbo mode: Double-click the side switch from On, or double-press the tail switch from Off.
Mode 2 available levels: Medium, Turbo, and Strobe.
Mode 2 functions basically as a stripped-down “tactical” version of Mode 1. The main differences are:
- Single-click of the side switch from On only selects between Medium and Turbo now.
- Double-click of the the tail or side switch goes to Strobe instead of Turbo.
- There is no level memory now.
Otherwise, the two modes function the same way.
Battery indicator:
When first activating the light, the indicator on the side switch shows the battery voltage (lasts for ~5 secs):
- Solid green: ~70-100%
- Flashing green: ~40-70%
- Solid red: ~10-40%
- Flashing red: 0-10%
Mode memory:
Yes, in the Mode Group 1 for non-Turbo constant output modes. There is no memory in the Mode Group 2.
Shortcuts:
- Mode Group 1: Yes, for Eco, Turbo and Strobe (see above).
- Mode Group 2: Yes, for Eco and Strobe (see above).
Low voltage warning:
Yes, the main light will step down as the battery is running low. It will then turn Off at ~2.95V
Lock-out mode:
Yes, but physically – you lock-out the light by a twist of the tailcap.
Reviewer Comments:
As with the build, I think this is a reasonable dual-mode UI for a tactical light, with a general mode set and a tactical mode set.
One thing I’m not crazy about is the multiple-press functionality of the tactical tailcap switch. I didn’t really find this as much of an issue on the C8L, but my TD01’s switch is noticeably softer. This made it harder to consistently double-click the tailcap (i.e., soft-press, then press-and-click rapidly). But in any case, this level switching feature at the tailcap is completely unnecessary on the C8L/TD01 anyway, as you always have the electronic side switch in the head to control output levels (including accessing Turbo).
On the whole, I personally prefer General Mode Group 1, for its versatility. I suppose “tactical” people will like the lack of mode memory in Tactical Mode Group 2.
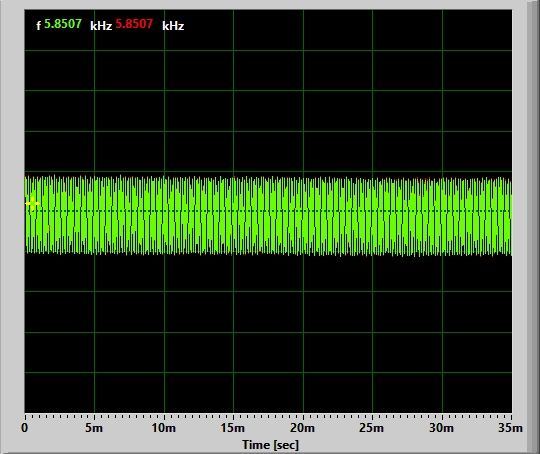
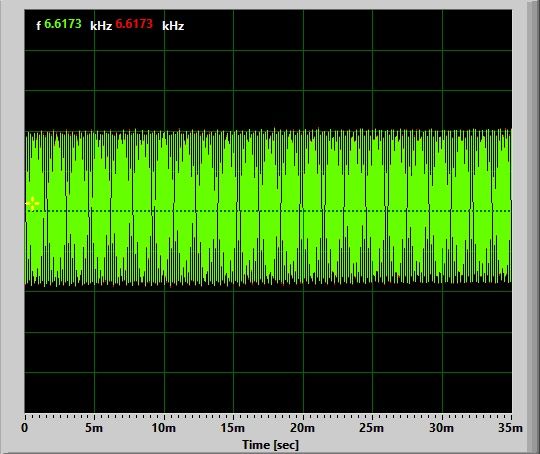
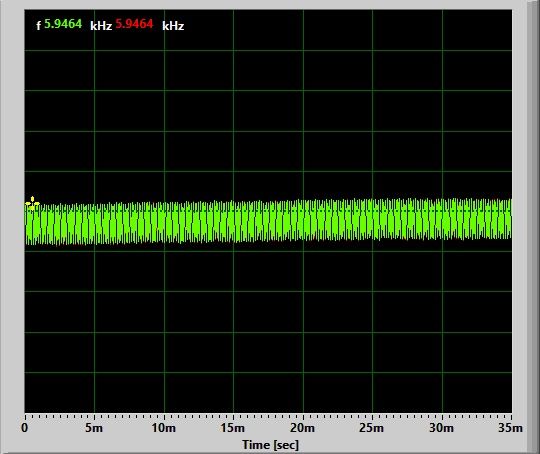
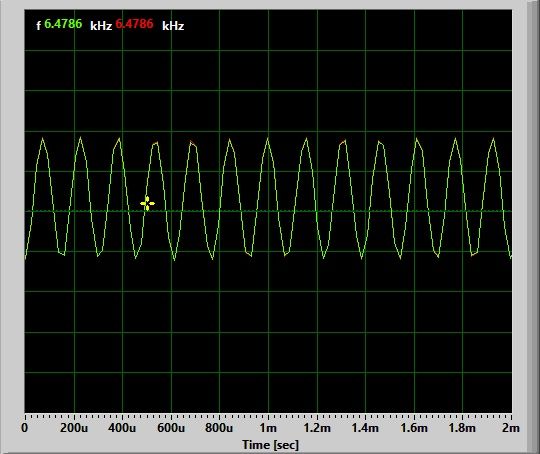
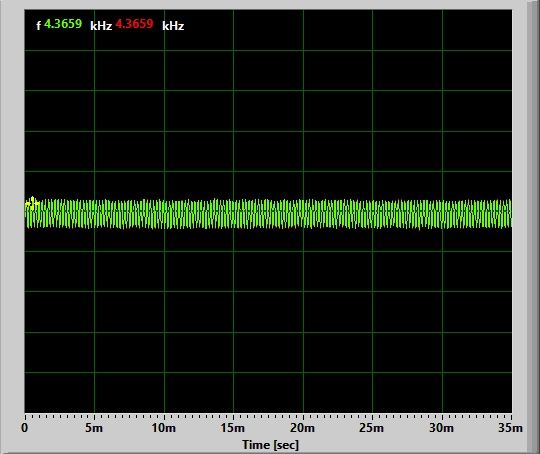
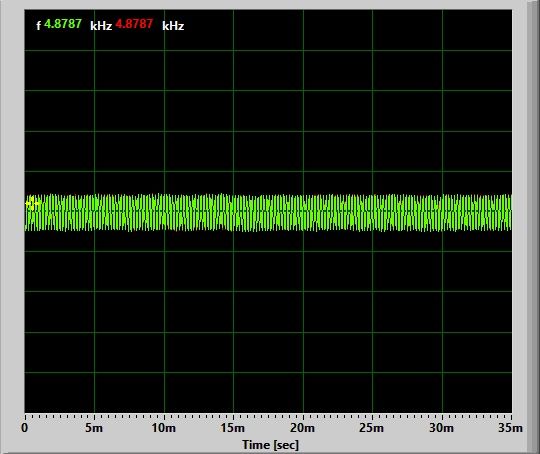
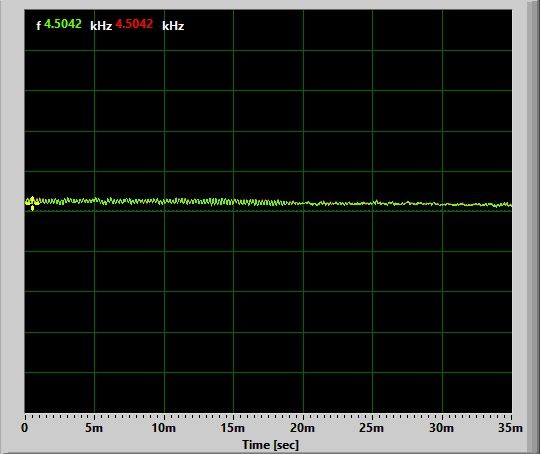
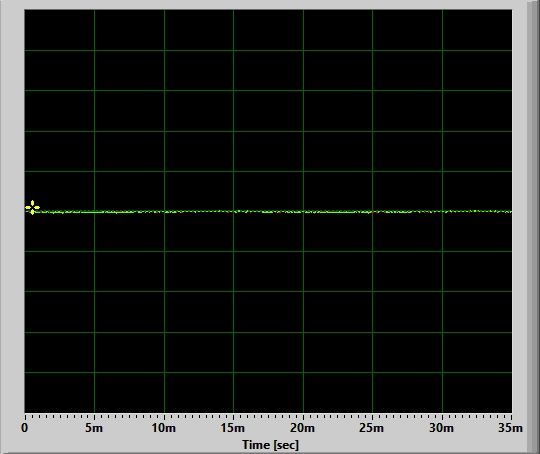
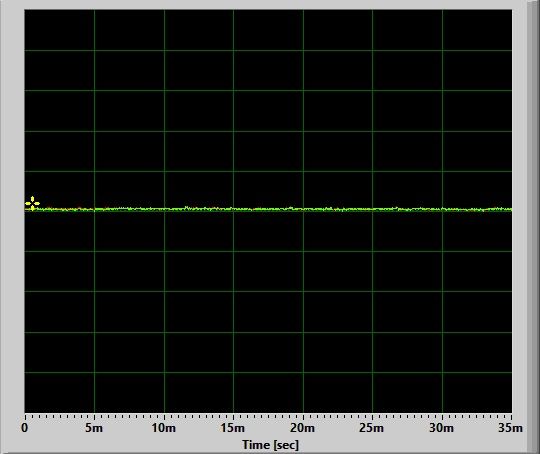
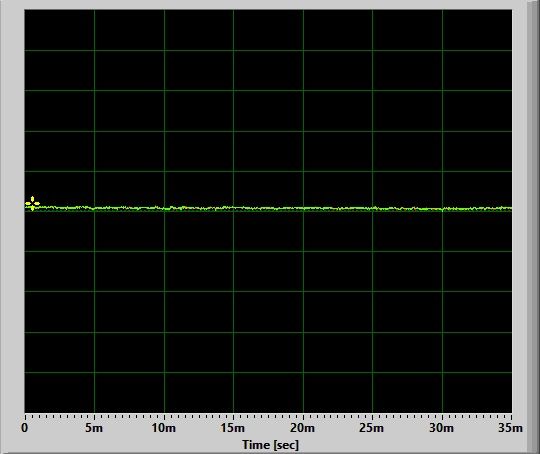
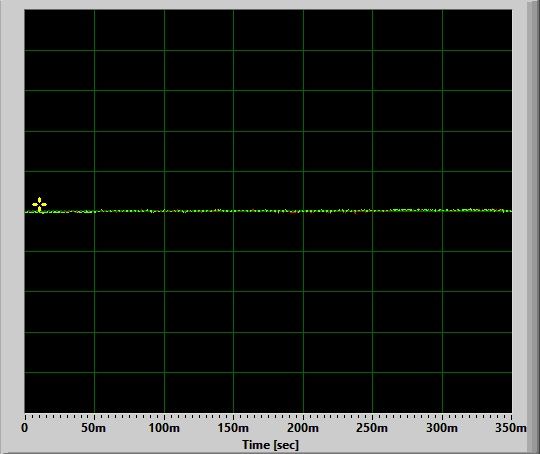
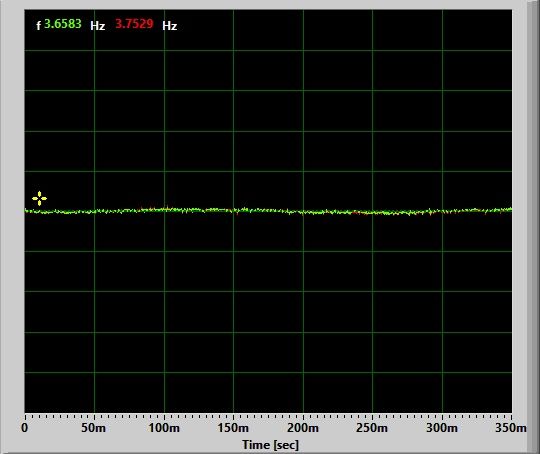
Circuit Measures
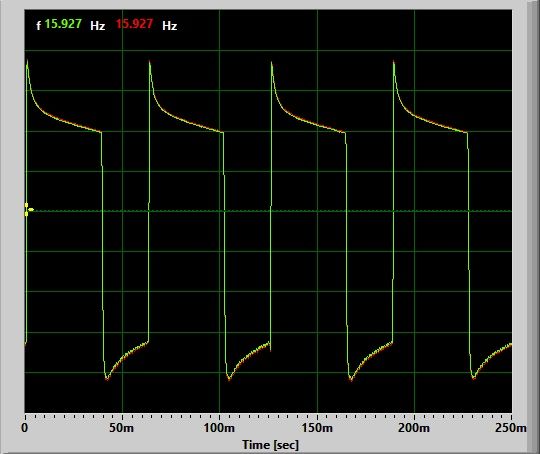
Pulse-Width Modulation (PWM):
Eco:

Low:

Mid:
High:

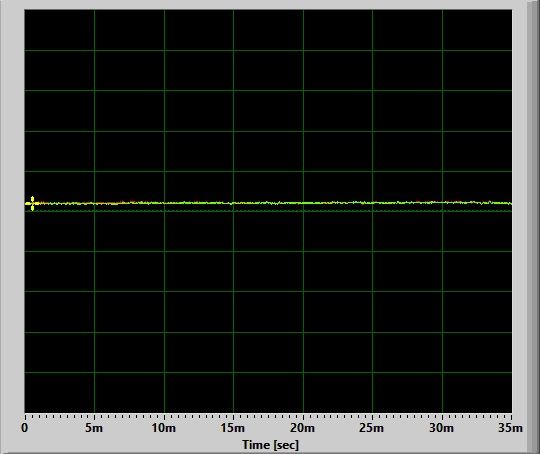
Turbo:

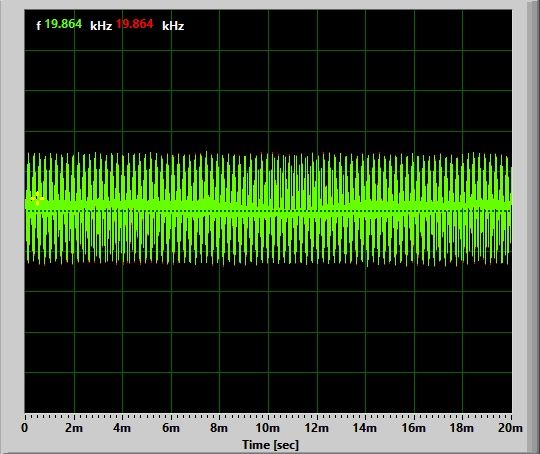
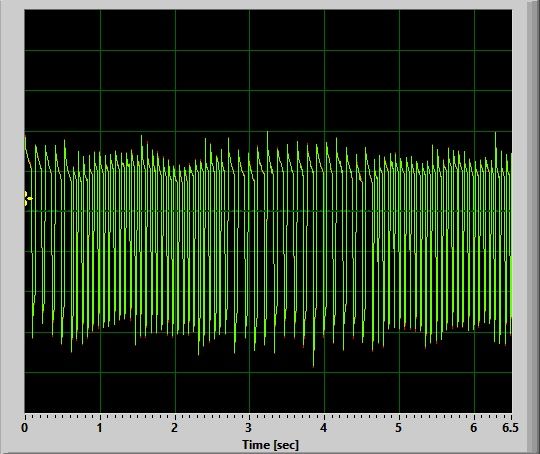
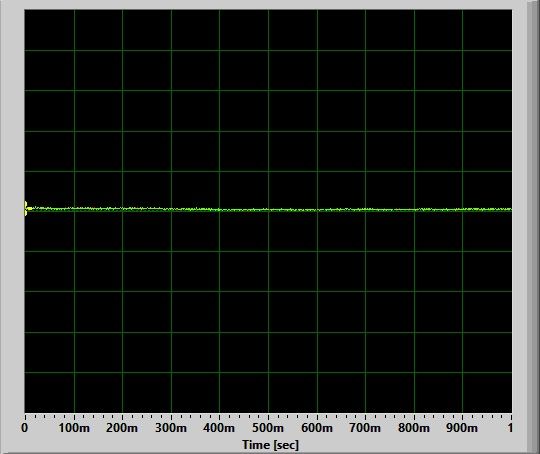
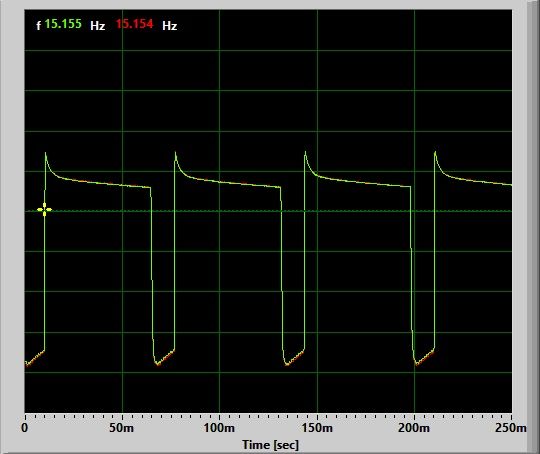
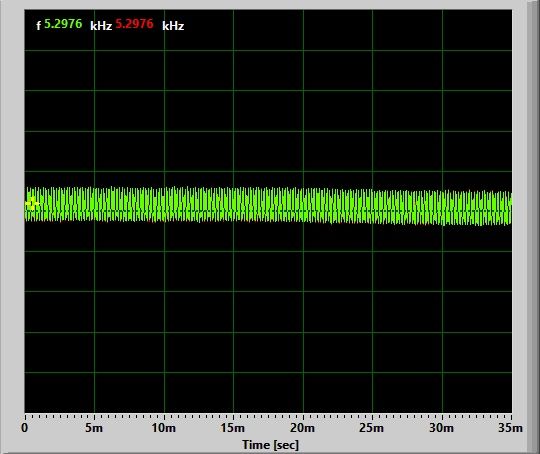
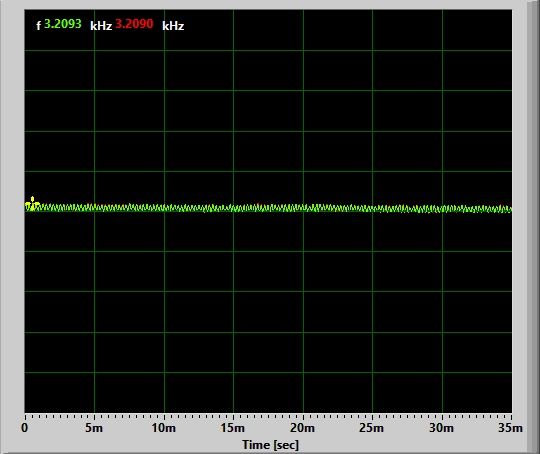
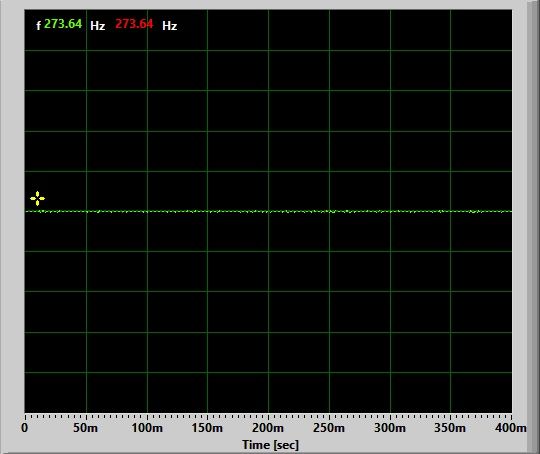
There is high frequency circuit noise on all levels except Turbo on the TD01, at a visually undetectable constant frequency of 19.9 kHz. This is different from the C8L, which was completely noise free. As is often the case, this constant circuit noise increases in amplitude with output level. It is definitely not PWM, although it has a bimodal distribution (i.e., there is a secondary harmonic of rising/cresting waves at ~5 kHz), as shown in the expanded view of the High mode below

Again, this is not a problem per se, as you won’t be able to see any of the above in use. But from long experience, I find this doesn’t bode well when it comes to overall circuit regulation and efficiency (scroll down for runtimes).
Strobes:
Strobe:
Strobe alternates between 8 Hz and 14 Hz every 2 secs or so. Very distracting.
SOS:
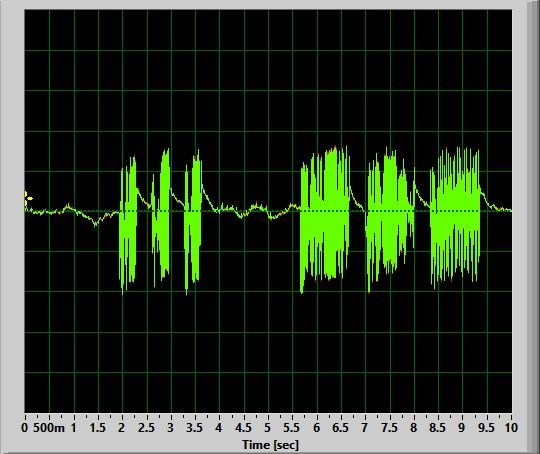
A standard SOS mode, relatively slow.
Beacon:
![]()
A single flash beacon once every 2 secs (0.5 Hz).
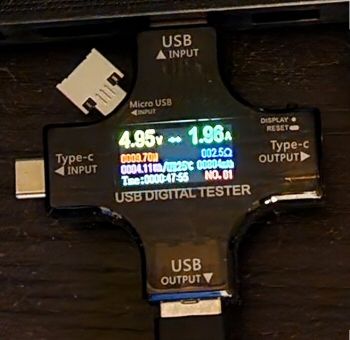
Charging:
The switch button shows solid red when the light is charging. Changes to solid green when the charging is complete.
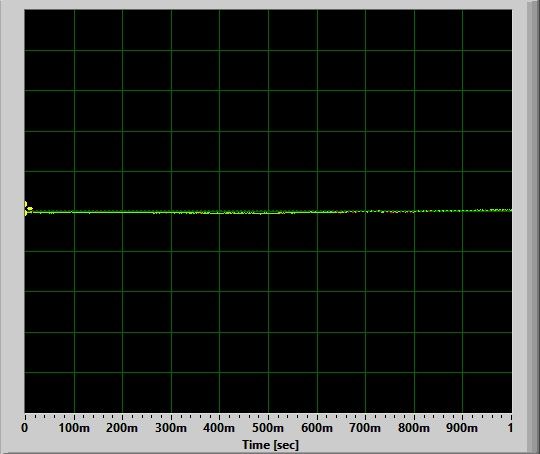
Resting voltage <3.0V
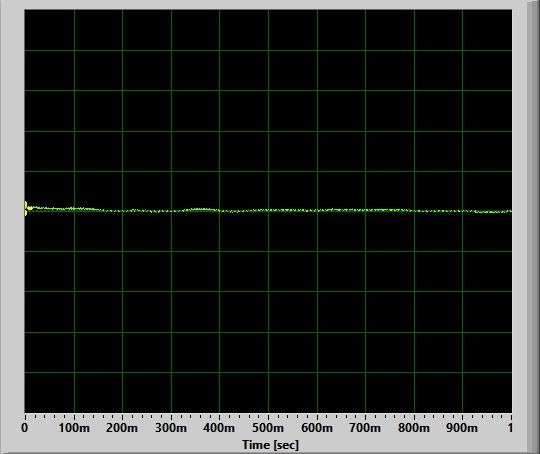
Resting voltage >3.0V
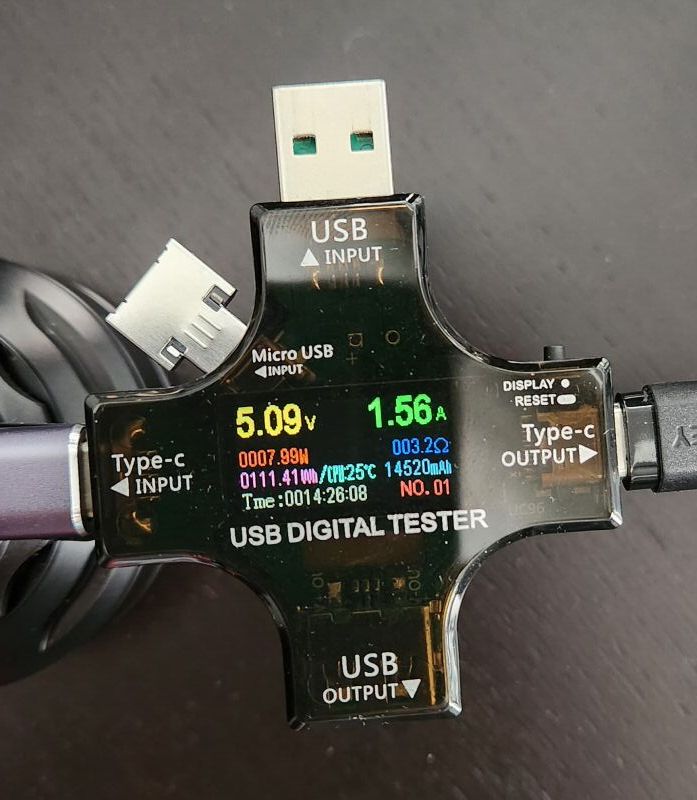
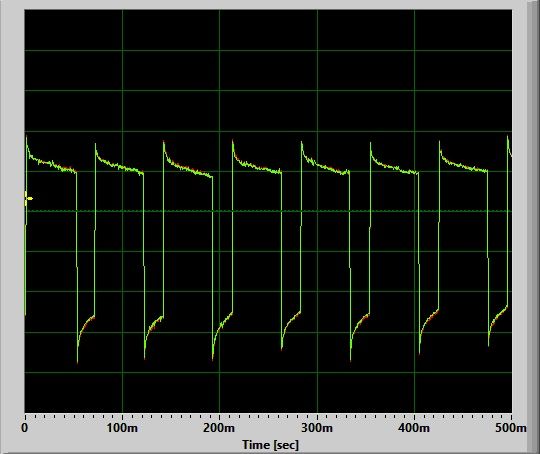
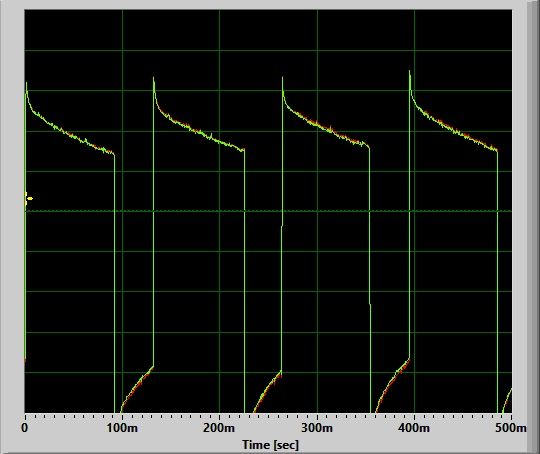
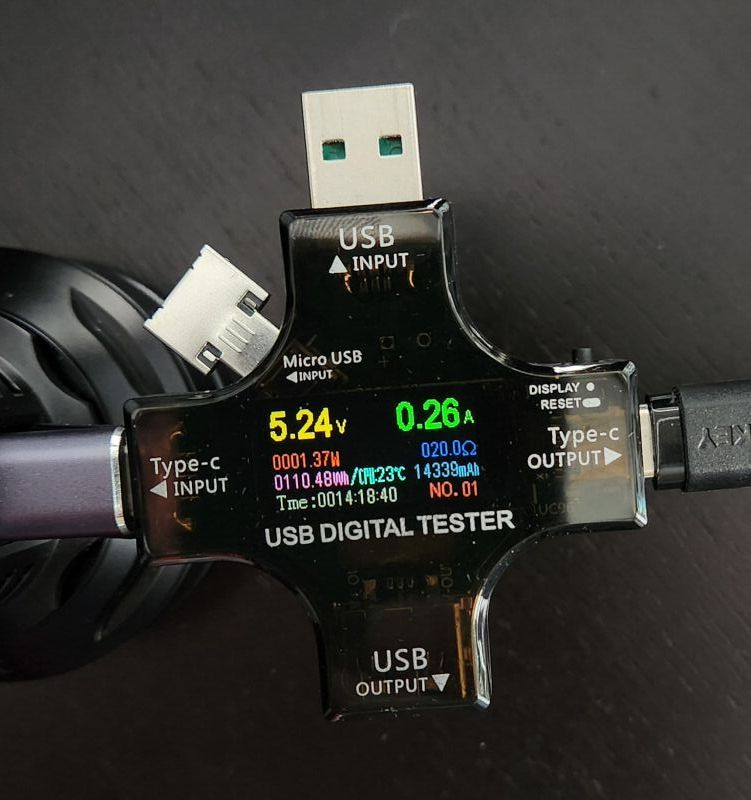
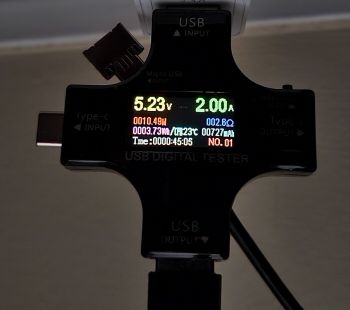
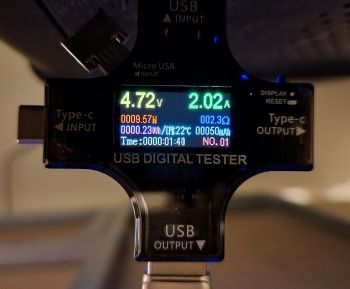
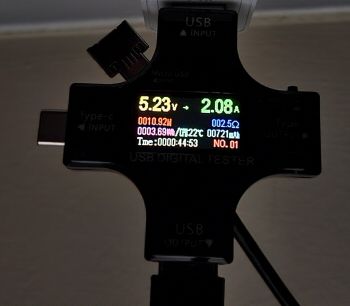
The TD01 has a two-stage charging feature, as seen on many modern lights (although oddly, not its sister light the C8L) where there is a lower initial charging rate when the cell is heavily discharged. The initial charging rate is ~0.25A, which jumps to ~1.55A once the cell exceeds 3.0V resting. These rates are good for a 21700 cell. Charging terminated at ~4.19V on my sample. This is probably the first example where the TD01 has a slight advantage over the C8L.
Standby / Parasitic Drain:
None. That is one of the nice things about a physical clicky switch, no standby current. 🙂 And you can always lock-out the light by a twist of the tailcap, to prevent accidental activation.
Emitter Measures
In this section, I directly measure key emitter characteristics in terms of colour temperature, tint, and colour rendition. Please see my Emitter Measures page to learn more about what these terms mean, and how I am measuring them. As tint in particular can shift across levels, I typically stick with the highest stably regulated level for all my reported measures.
As explained on that page, since I am using an inexpensive uncalibrated device, you can only make relative comparisons across my reviews (i.e., don’t take these numbers as absolutely accurate values, but as relatively consistent across lights in my testing).
TD01 on Med:
.jpg)
.jpg)
The key measures above are the colour temperature of ~6045K, and a noticeably positive tint shift (+0.0138 Duv) to greenish-yellow at this temperature. For CRI (Ra), I measured a combined score of 64.
These values are very consistent with the rated specs for the cool white SFT40 emitter on my sample, and match my visual experience of this light.
Beamshots
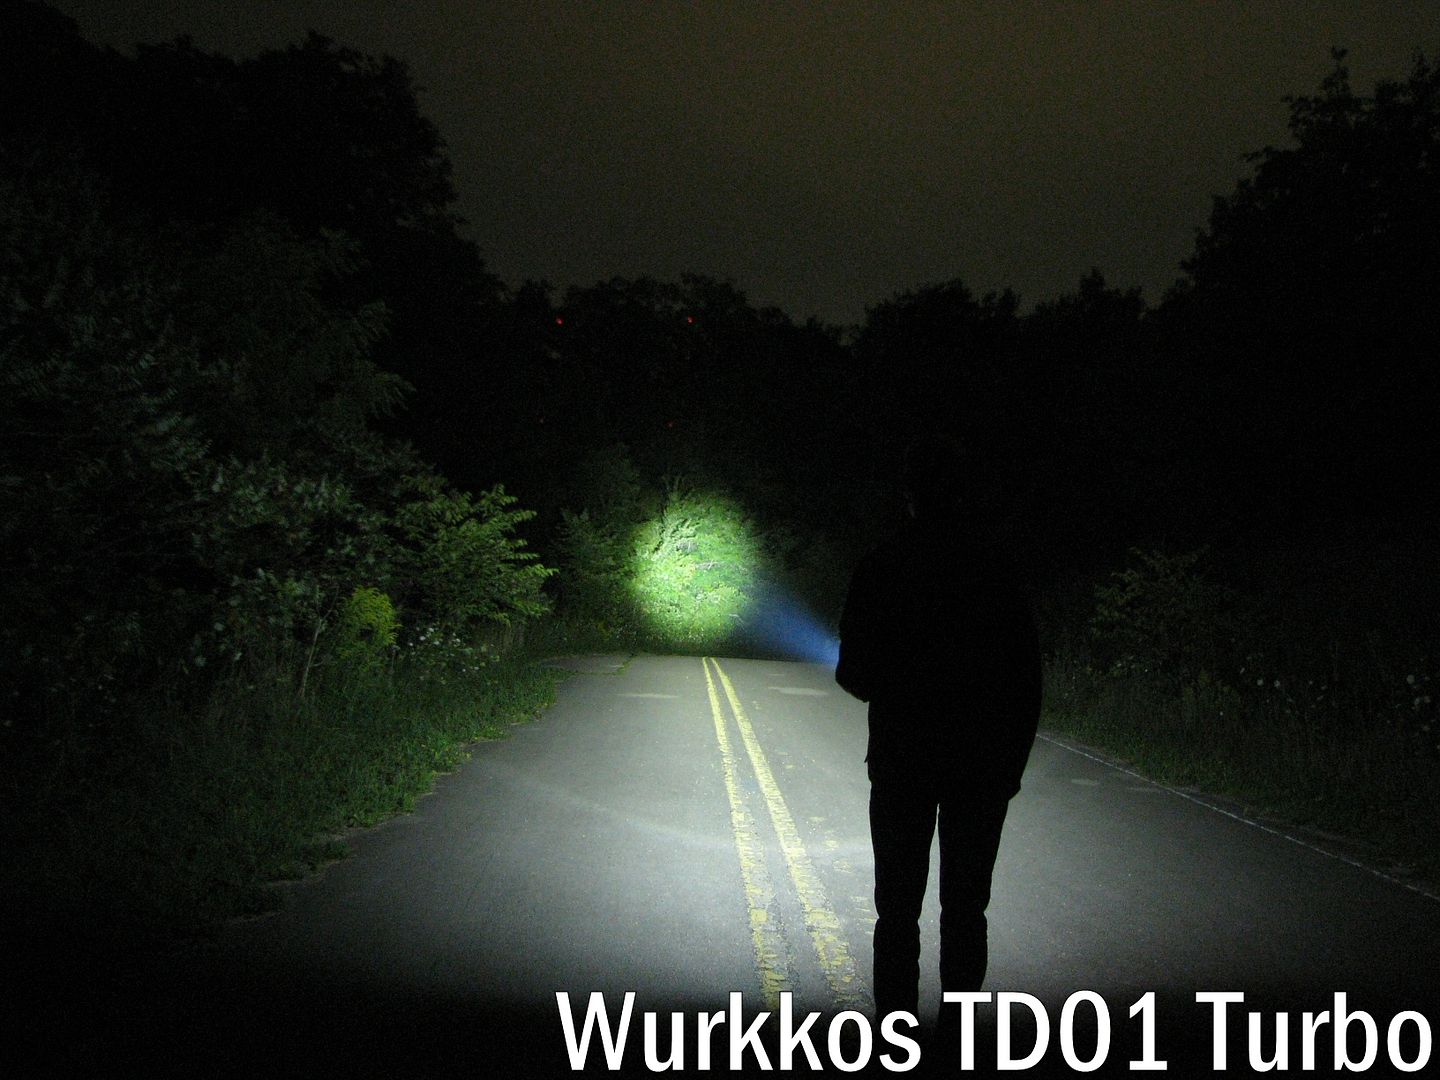
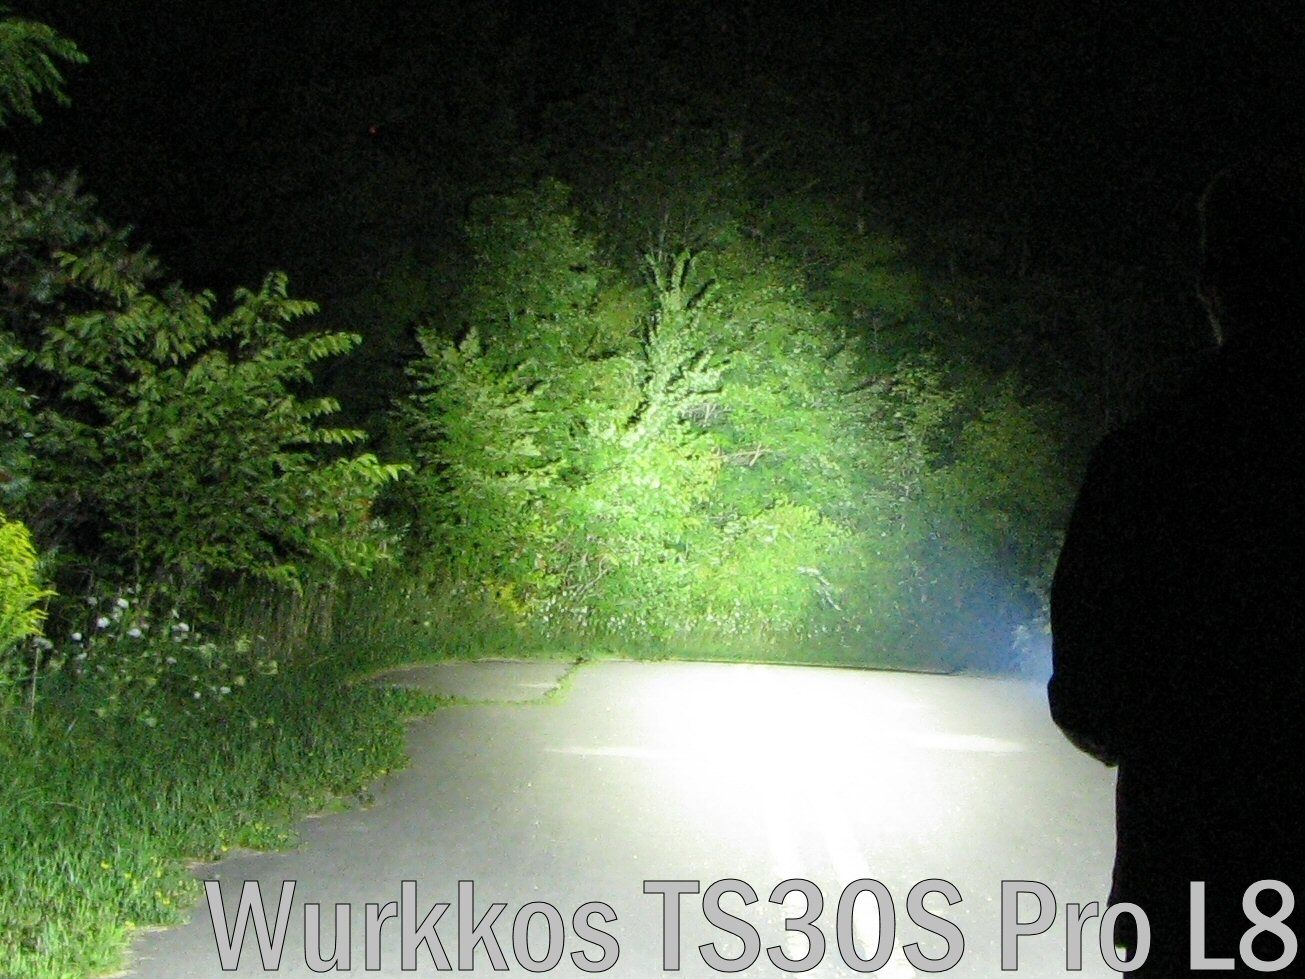
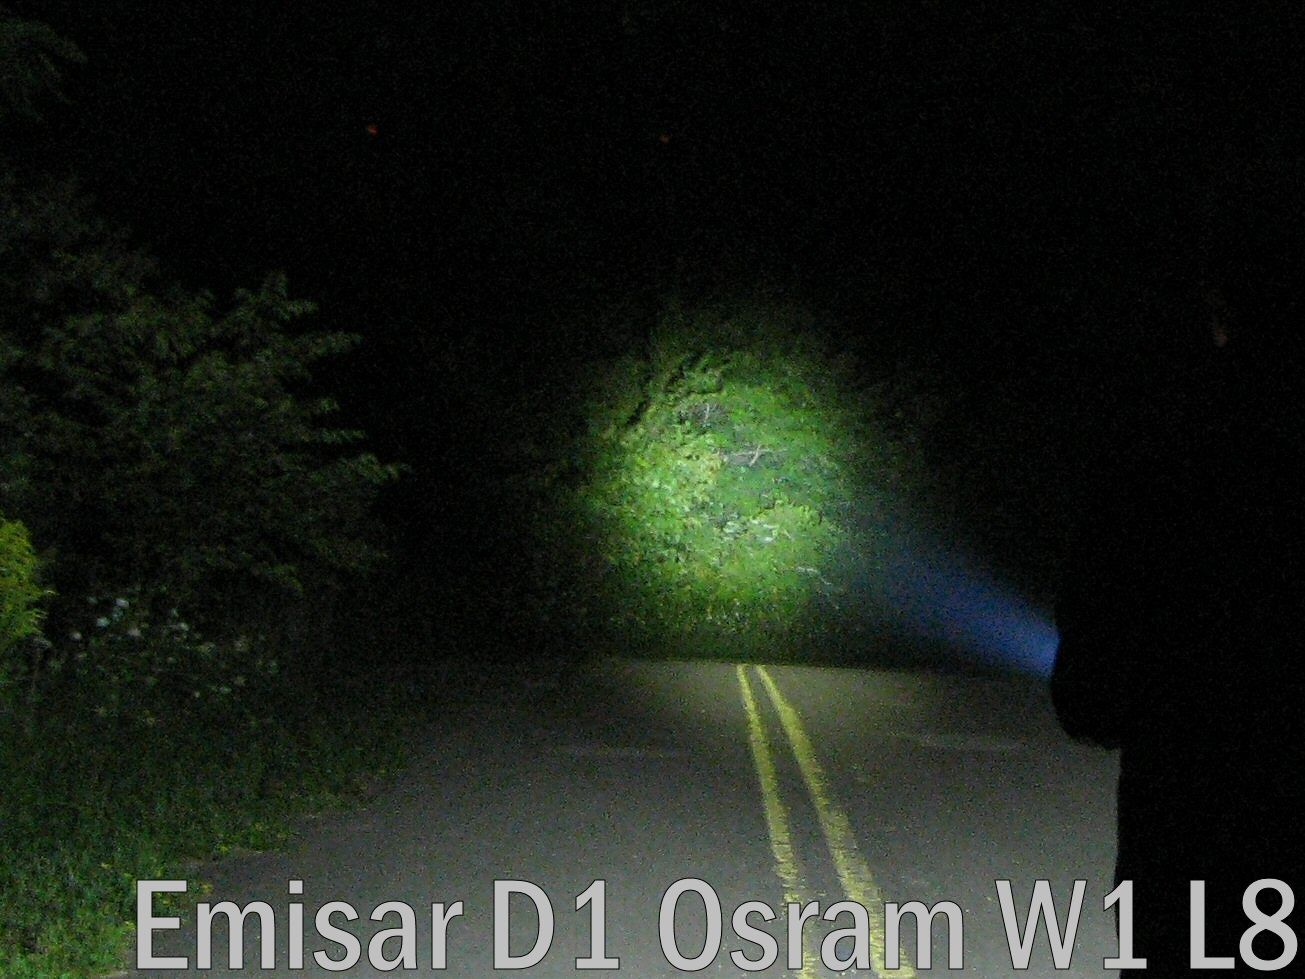
All long-distance outdoor beamshots are taken on my Canon PowerShot S5 IS at f/2.7, 1 sec exposure, ISO 400, daylight white balance. The tree at the centre of the hotspot is approximately 90 meters (~100 yards) from the camera. Note the road dips down and turns away in the distance, out of the camera’s sight line. Learn more about my outdoor beamshot locations here.
Click on any thumbnail image below to open a full size image in a new window. You can then easily compare the overall beams by switching between tabs.

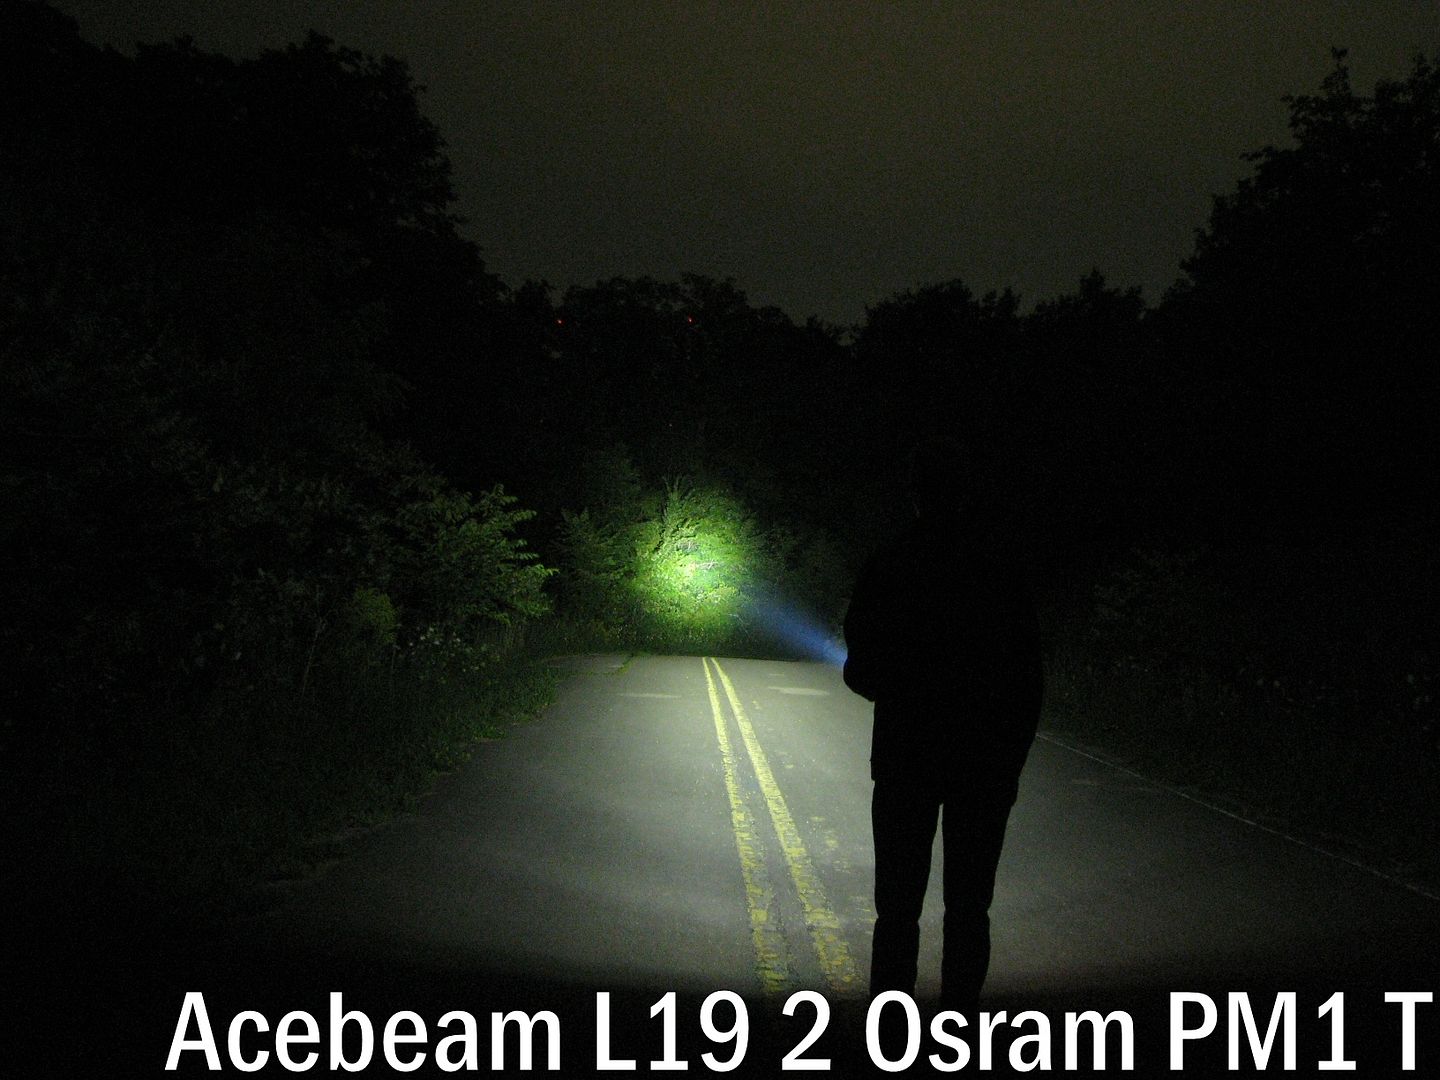
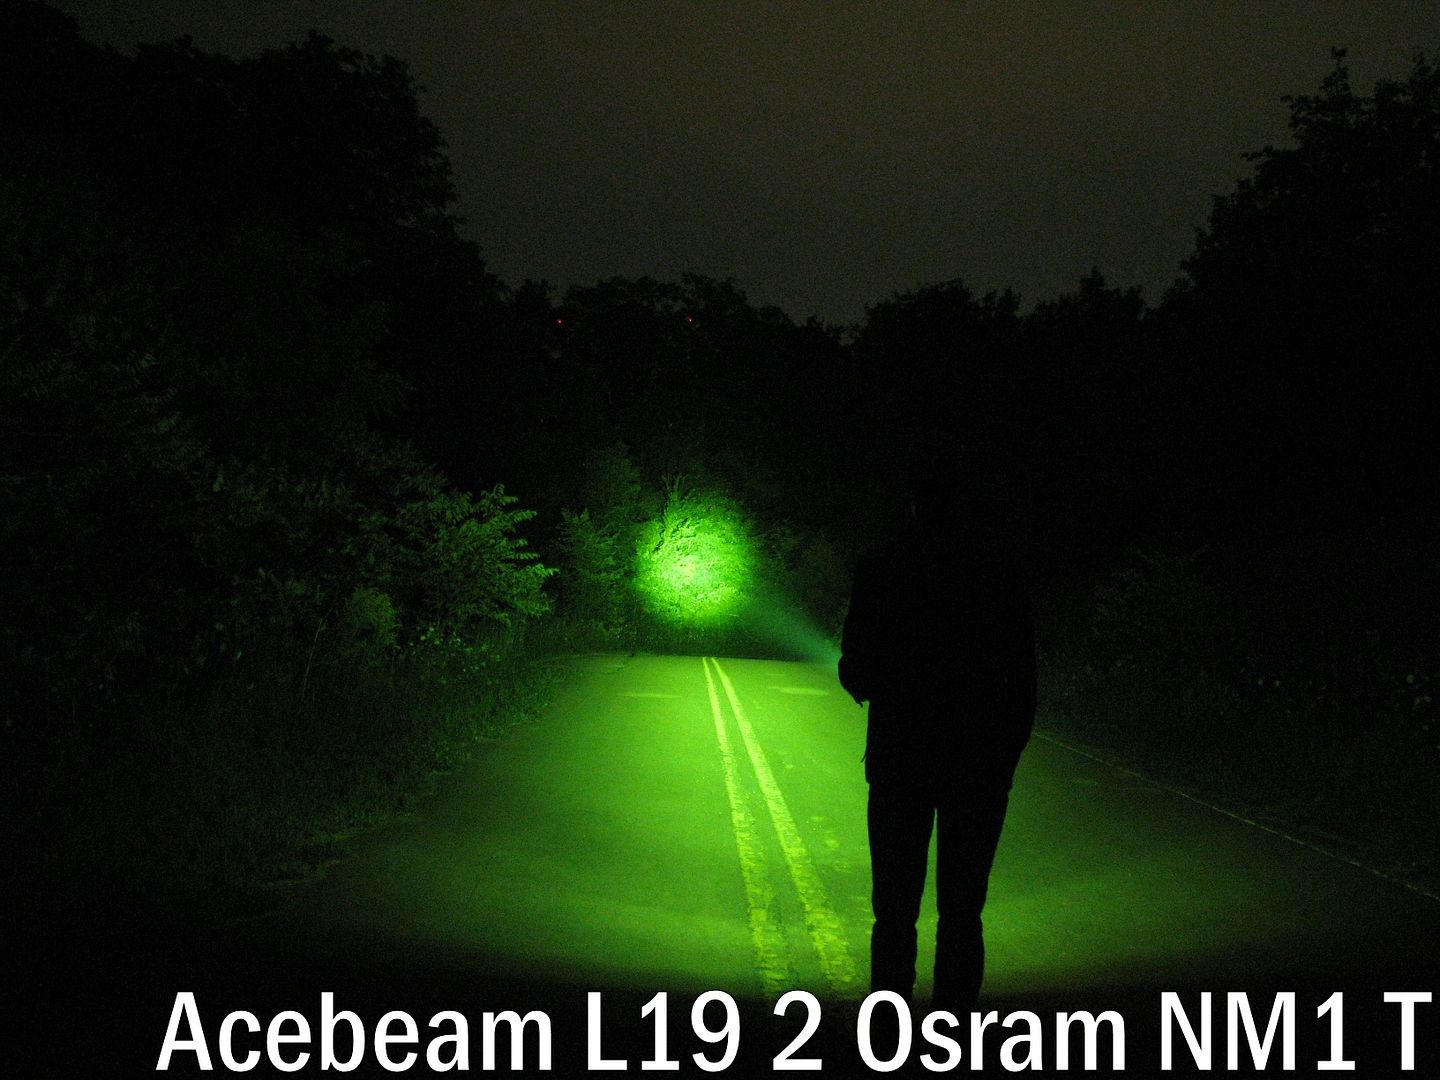
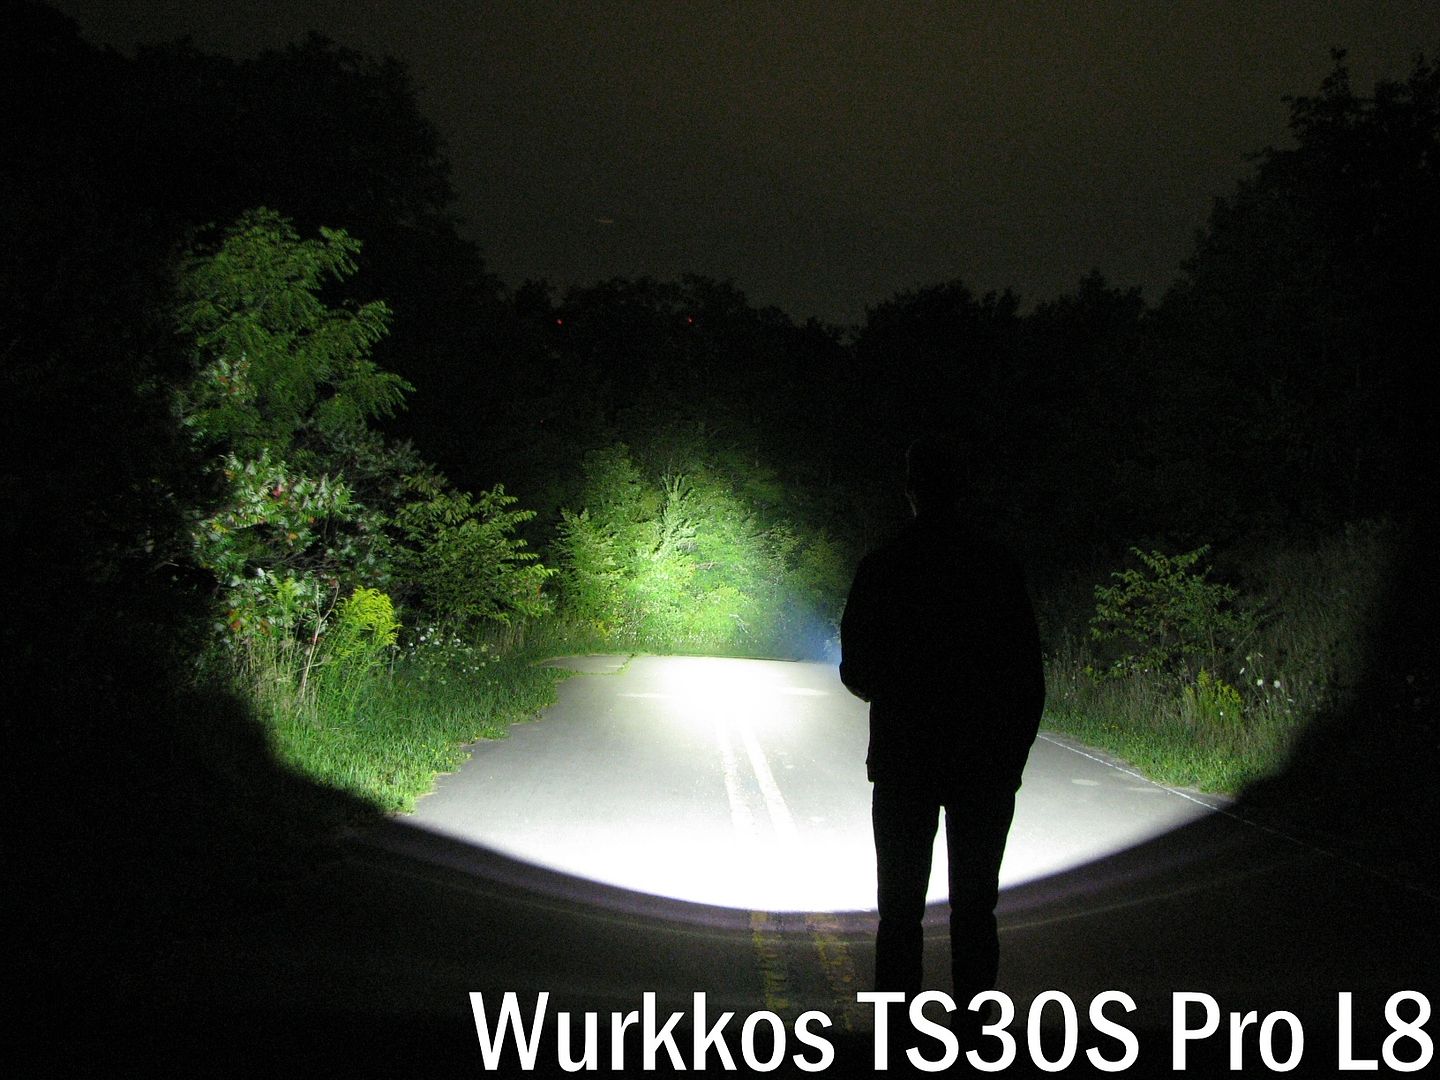
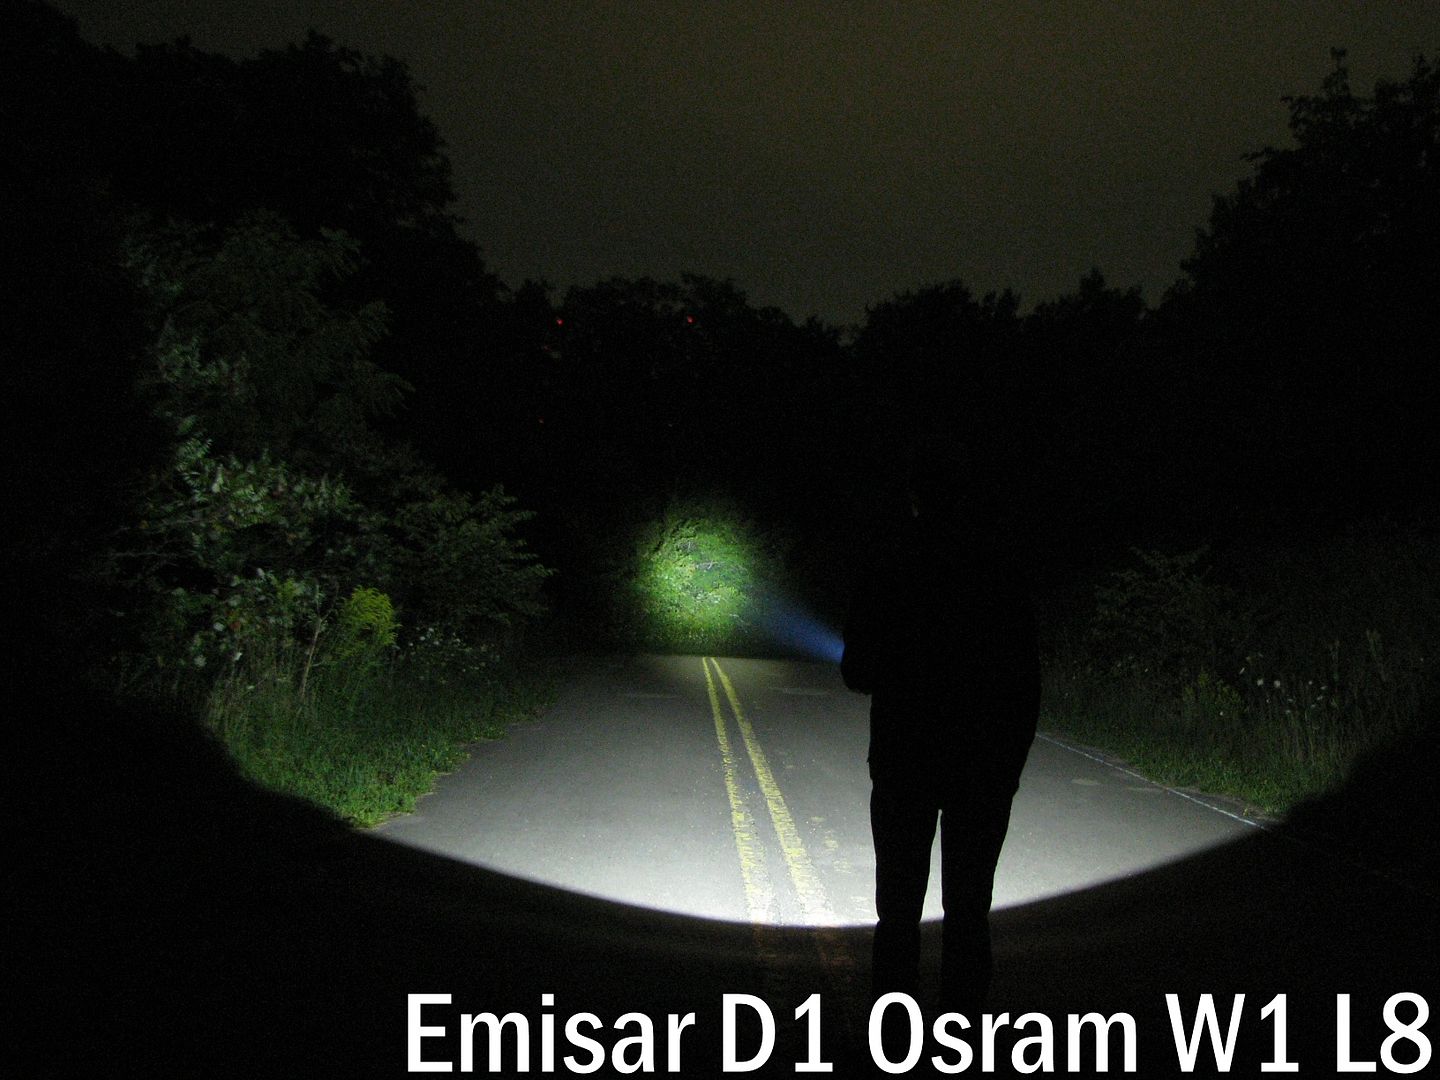
To help illustrate the hotspots better, I’ve also cropped the raw pictures around the centre of the frame. As before, click on any thumbnail below to open a full size image in a new window.
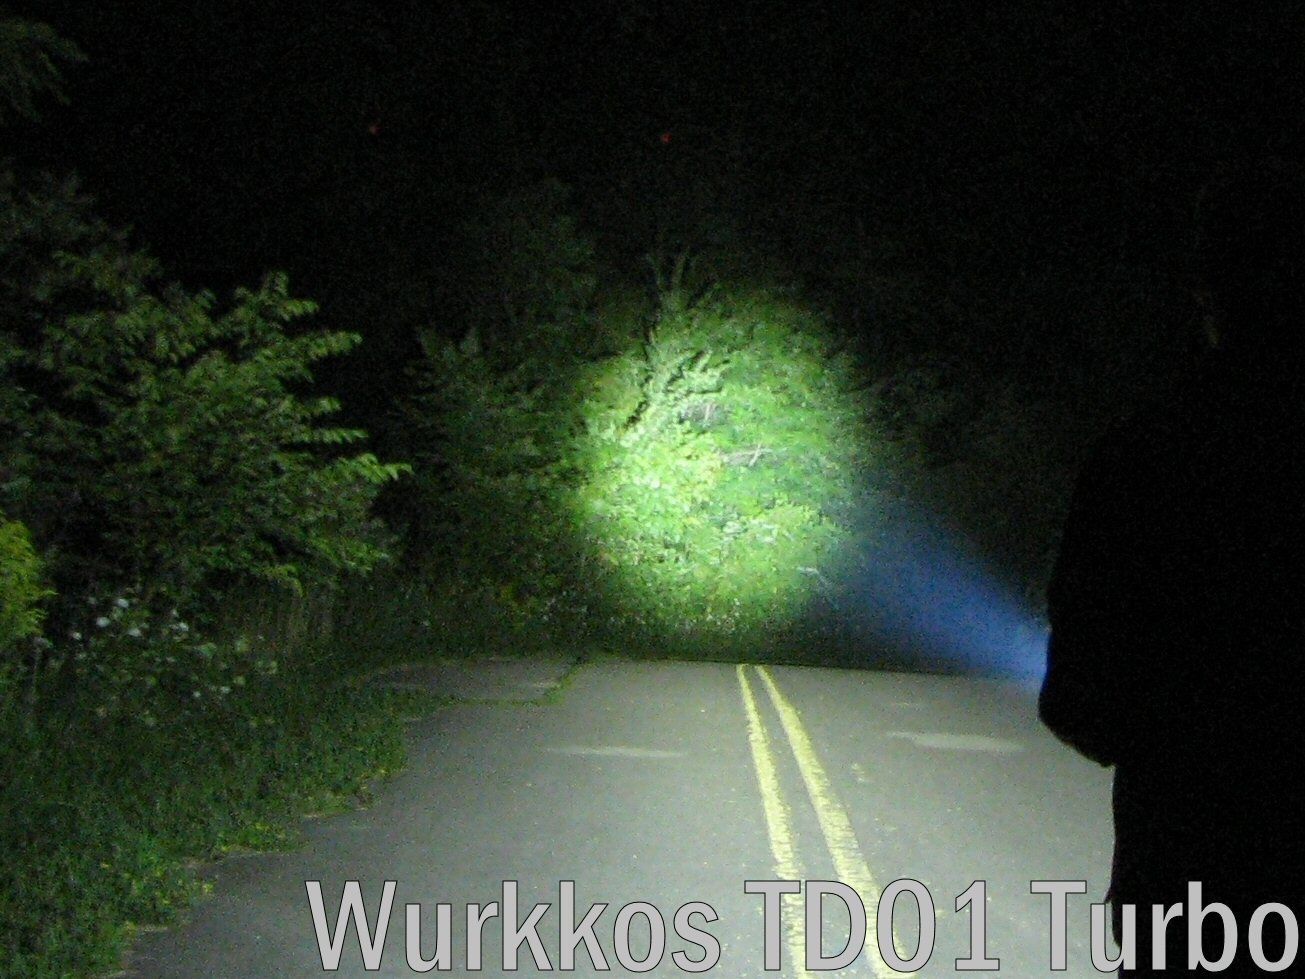

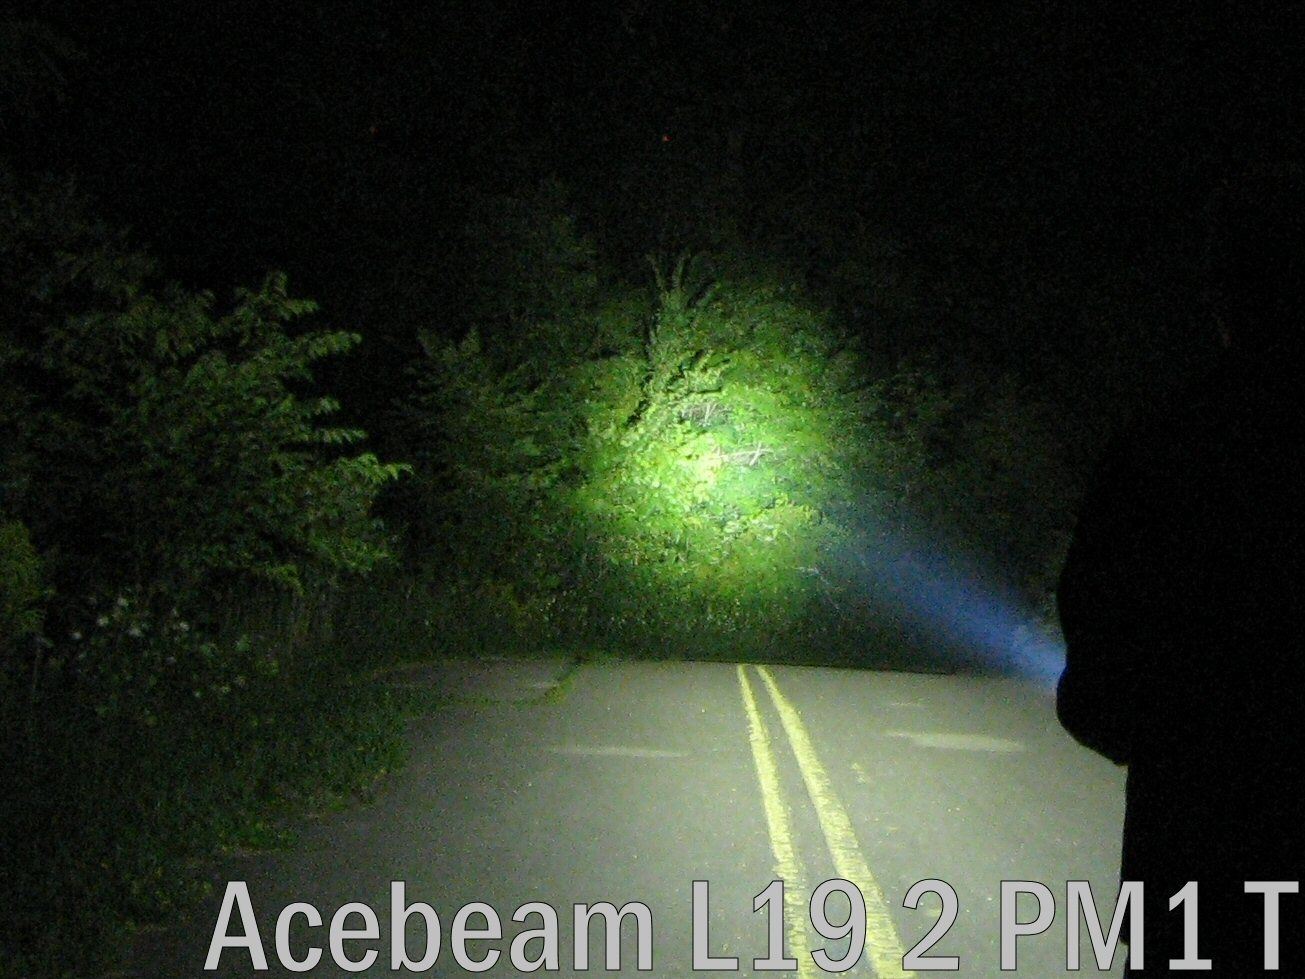

As you can see above, the TD01 is a very focused thrower. It does put out a little more light into the periphery than the L19, and with a slightly larger hotspot. But this is an incredible thrower.
Testing Results
My summary tables are generally reported in a manner consistent with the ANSI FL-1 standard for flashlight testing. In addition to the links above, please see my output measures page for more background.
All my output numbers are based on my home-made lightbox setup. As explained on that methodology page, I have devised a method for converting my lightbox relative output values to estimated lumens. Note that my lightbox calibration seems to run higher than most hobbyists today, but I’ve kept it to remain consistent with my earlier reviews (when the calibration standard was first established).
My Peak Intensity/Beam Distance are directly measured with a NIST-certified Extech EA31 lightmeter.
TD01 Testing Results
| Mode | Spec Lumens | Estimated Lumens @0sec | Estimated Lumens @30 secs | Beam Intensity @0sec | Beam Intensity @30secs | Beam Distance @30secs | PWM/Strobe Freq | Noise Freq | Charging Current <3V | Charging Current >3V | Parasitic Drain | Weight w/o Battery | Weight with Battery | CCT (K) | Duv | CRI |
|---|---|---|---|---|---|---|---|---|---|---|---|---|---|---|---|---|
| Eco | 30 | 29 | 28 | - | - | - | No | 19.858 Hz | 0.25 A | 1.55 A | No | 193 g | 261 g | - | - | - |
| Low | 150 | 155 | 150 | - | - | - | No | 19.858 Hz | 0.25 A | 1.55 A | No | 193 g | 261 g | - | - | - |
| Med | 350 | 290 | 285 | - | - | - | No | 19.864 Hz | 0.25 A | 1.55 A | No | 193 g | 261 g | 6,045 | 0.0138 | 64 |
| High | 900 | 760 | 740 | - | - | - | No | 19.878 Hz | 0.25 A | 1.55 A | No | 193 g | 261 g | - | - | - |
| Turbo | 2,200 | 2,100 | 2,000 | 255,000 cd | 235,000 cd | 970 m | No | - | 0.25 A | 1.55 A | No | 193 g | 261 g | - | - | - |
| Strobe | 2,200 | - | - | - | - | - | 8-14 Hz | - | 0.25 A | 1.55 A | No | 193 g | 261 g | - | - | - |
| SOS | 350 | - | - | - | - | - | - | 19.858 Hz | 0.25 A | 1.55 A | No | 193 g | 261 g | - | - | - |
| Beacon | 2,200 | - | - | - | - | - | 0.5 Hz | - | 0.25 A | 1.55 A | No | 193 g | 261 g | - | - | - |
Unlike my TS22 and C8L samples, the TD01 has inflated specs on its higher levels, compared to what I measure in my lightbox. Oddly, it’s worse on the Med and Hi levels, with Turbo only being inflated by ~10% in my lightbox. Although it is probably even worse than the numbers above suggest, as I know my lightbox’s relative calibration is generously high for modern high-output lights.
My NIST-calibrated luxmeter is accurately calibrated to an absolute standard, and reports slightly lower beam intensity on Turbo (comparable to my lightbox for overall output measures). But this is still an impressive showing.
To view and download full testing results for all modern lights in my testing, check out my Database page.
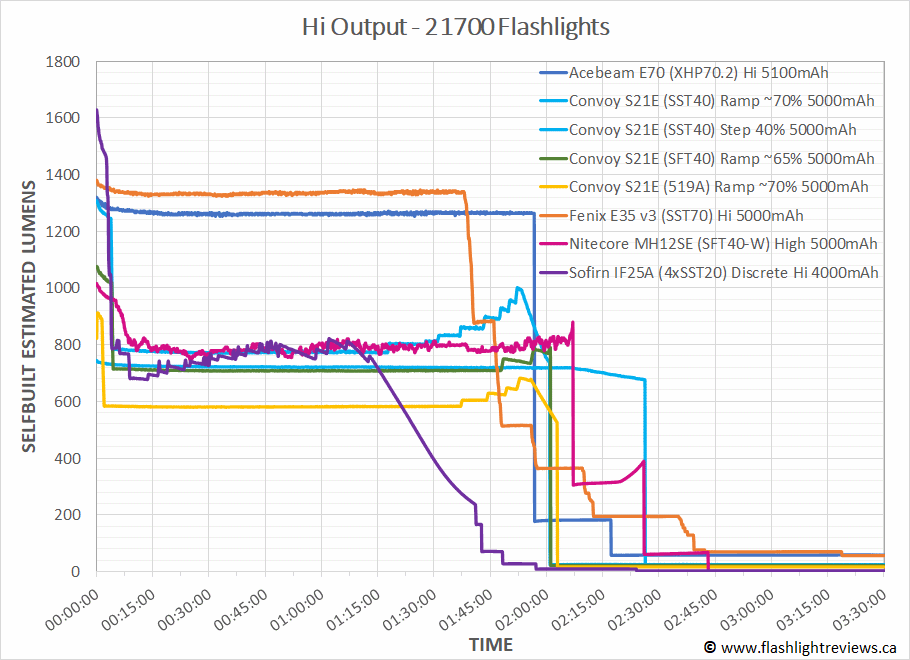
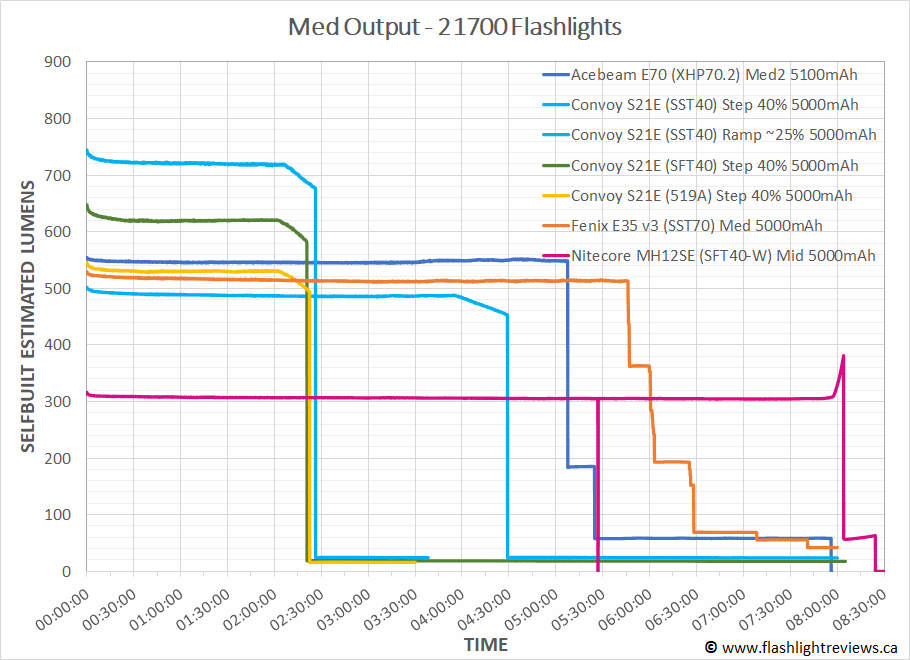
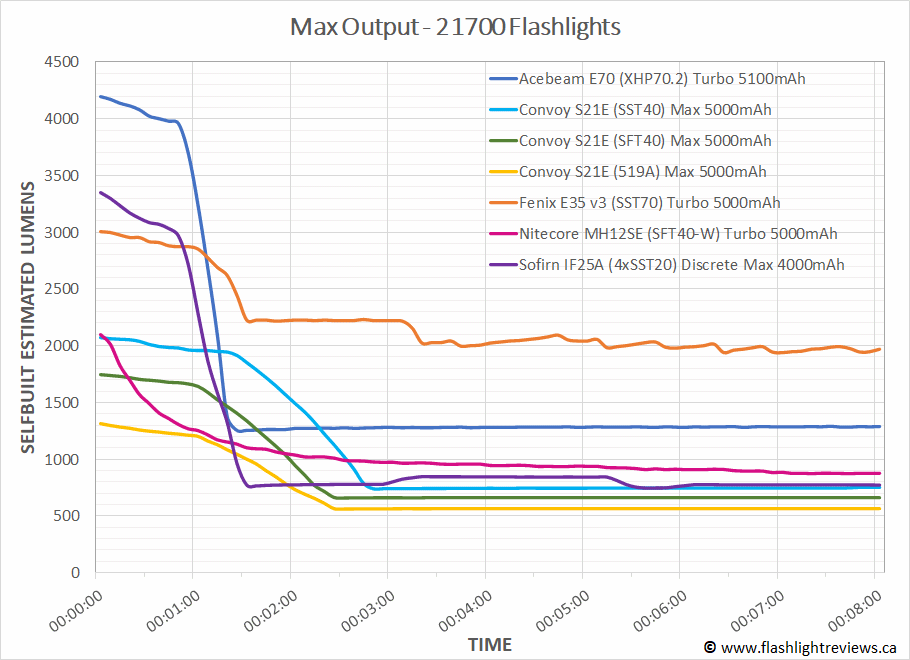
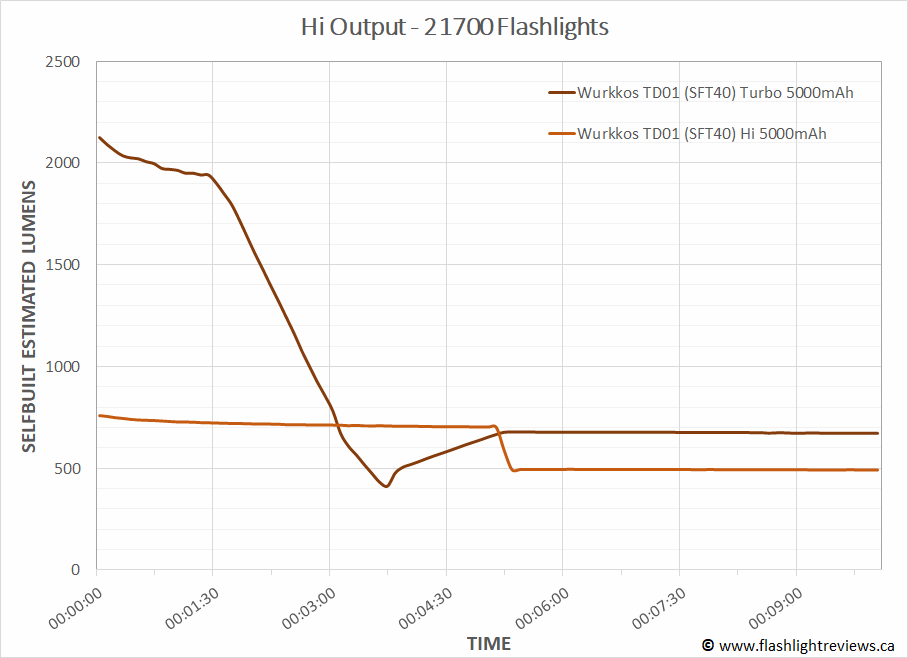
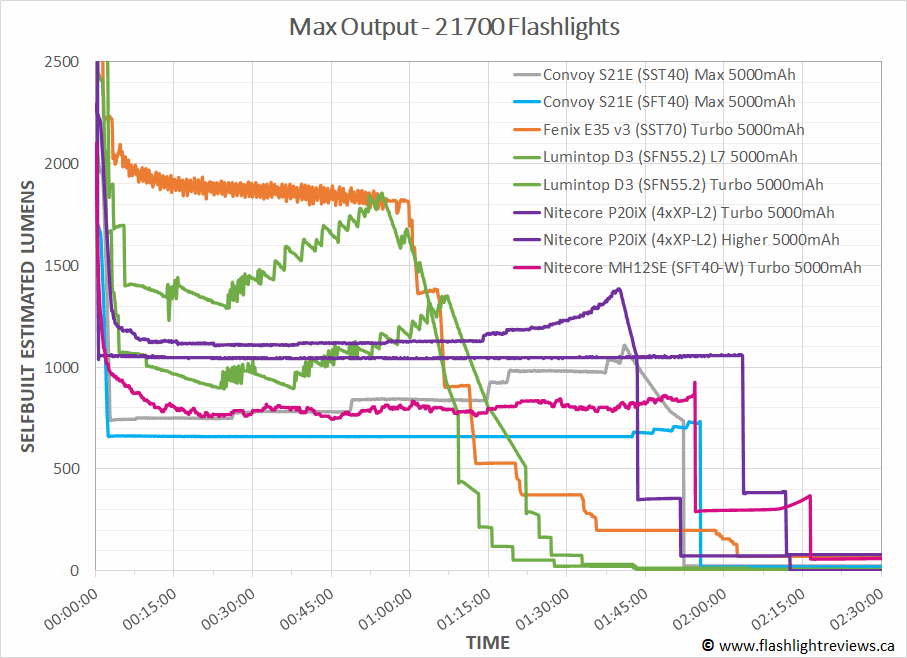
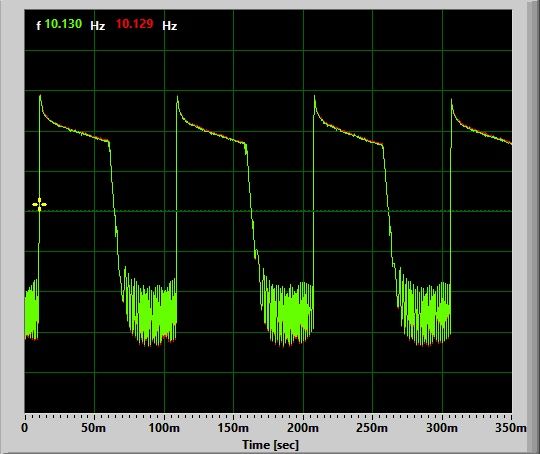
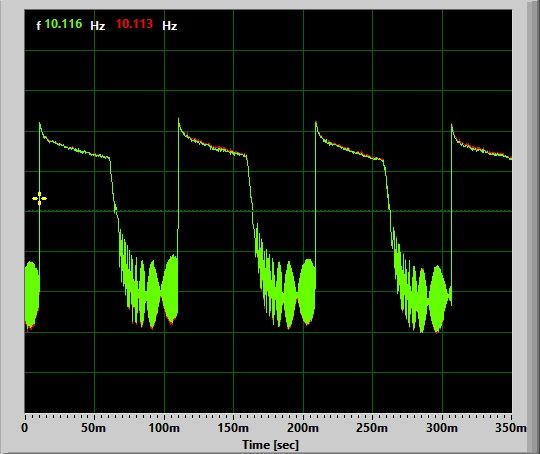
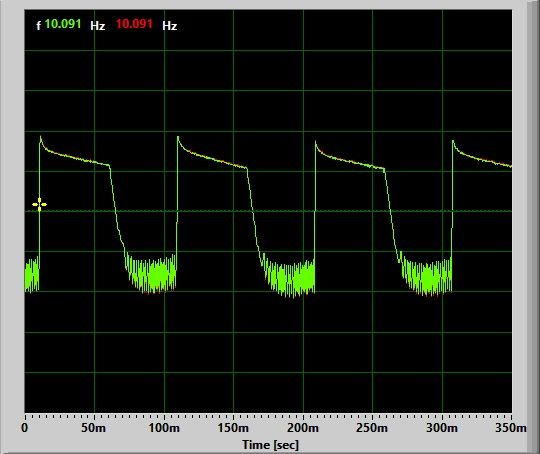
Runtimes
As always, my runtimes are done under a small cooling fan, for safety and consistency. To learn more about how to interpret runtime graphs, see my runtimes methodology page.


One thing these results make very clear: Wurkkos is definitely not using a buck driver on the TD01. There had been some apparent miscommunication on this point when the light was first announced. It appears to be using a standard FET driver, producing the non-voltage-regulated runtimes you see above.
In and of itself, this is not necessarily a problem – such lights can still be relatively efficient. But that doesn’t really seem to be the case here. It is not as efficient as the Convoy S21E that I tested with this same SFT40 emitter – that light had perfectly flat regulated output (which lowers overall efficiency, since it spends a lot more time at higher output, plus has circuit overhead to consider). So performance here is disappointing, especially in comparison to the outstanding efficiency and regulation that you can see on the TS22 and the Sofirn C8L.
You can also see that the TD01 steps down very quickly on Turbo and Hi. To better show this initial step-down pattern, here is a expanded view of first few minutes of those runtimes:
Pros and Cons
| Pros | Cons |
|---|---|
| As advertised, the light is a very dedicated thrower, thanks to its large focused TIR optic. | Circuit is not voltage-regulated, producing a slowly decreasing output instead of flat runtimes. It also appears to be less efficient then other current-controlled lights with flat regulation. |
| The light has a solid build with good handfeel, although there are some small issues (see Cons). | Tactical forward clicky switch has a softer feel than typical, making signalling or double-clicking difficult. It also protrudes too far, preventing tailstanding. |
| Price is incredibly low, making this arguably the best throwing light of the 1x21700 class at this price point. | Light can roll very easily, with no preventive measures to impeed. |
| Output specs seem to be somewhat inflated. | |
| Would really benefit from an included holster. |
Overall Rating

Preliminary Conclusions
Many of my build observations of the Sofirn C8L are true here as well – in many ways, this is a sister light to that model, but one that is heavily focused for throw. The lights are very similar in overall build quality and packaging, reflecting the common factory they are produced at (despite being different companies). The dual physical tailcap clicky and side electronic switch design – along with an identical user interface – further cements their close relationship.
But the switches are where I find the comparison starts to break, and not in the TD01’s favour. The switch feel is softer on my TD01 sample than the C8L, limiting its value for momentary signalling. And because it protrudes further than my C8L sample, the TD01 doesn’t tailstand at all, which is disappointing. Not a huge deal of course, but it is a minor annoyance that could easily have been avoided.
Overall output/runtime efficiency is fine for a SFT40 emitter, but overall output is lower than rated for the specs on this model. And unfortunately regulation is disappointing here too – especially against the outstanding TS22 and Sofirn C8L. It looks like Wurkkos simply reused an older driver/circuit for the SFT40 emitter, and updated it with the C8L’s user interface. I would have preferred to see a fully voltage-regulated pattern here.
Beam pattern is very throwy as advertised, and I find the TIR optic does a really good job of focusing almost exclusively for throw. There is just one noticeable beam ring – but that’s more an issue on a white wall than in actual use outdoors. It really is quite the spotlight!
Despite the close similarities to the C8L – and the impressive TIR optic here – I can’t give this light higher than 3.5 stars in its current form. The physical quirks with the switch, and the more significant circuit issues (i.e., off from the specs, lower sustained output, lack of voltage regulation, reduced efficiency, circuit noise, etc.) knock this light down a full star from the C8L in my view.
It is still an incredible value for the price, and I appreciate all that it does bring to the table. If the issues above don’t matter to you, this is a great way to experience massive TIR throw at a budget price (it really is unbelievably cheap!). As the beamshots show, that is an incredible beam. With a little more fine-tuning, this could become a top pick in the dedicated TIR thrower class.
Acknowledgement
The TD01 was supplied by Wurkkos for review. As always, all opinions are my own and the light received the same rigourous and objective testing as all other lights that I have reviewed. At the time of review, this light retails for ~$45 USD (~$60 CDN) with typical discounts on their website here.

_20230319_140329.png)
_20230319_140317.png)
_20230319_140309.png)
_20230319_140322.png)
_20230319_140422.png)
_20230319_140443.png)

_20230319_140538.png)
_20230319_140551.png)
_20230319_140709.png)
_20230319_140718.png)
_20230319_140804.png)
_20230319_140907.png)


_uC3SHbWjRQg1edDgcJsnAj.jpg)
_5CormVqaoM1FaVaTwLp9AD.jpg)
_05_6xufWKrQKnW4MEhtSH4zdz.JPG)
_05.JPG)
_05.JPG)
_05_sT82YVKHUit9Y5nmYpDhrZ.JPG)
_05_3qpnSz17JCXCDo3FBwuk5N.JPG)
_05_konN9xoDtcwHtsox8aAfSt.JPG)


_5SyYFvuFxQNnb8EdsmGqTL.jpg)
_meAKs77N7LcHiMwZNZmRhu.jpg)
_sCaSsDbH34hWuiuUSf6hWS.jpg)
_vESHyKmJcTuTezAbYhK8NF.jpg)
_48WrNCHKKGScy8ejLChhHN.jpg)
_ecZKTv6DpJ9b4ZfnFgFrnv.jpg)
.JPG)
.JPG)
.JPG)
.JPG)
.JPG)
.JPG)